PC building details – Component compatibility
The number one requirement of building a home/office or gaming PC is to buy components that are compatible.
The more of them that you can buy – at competitive prices – from a single supplier, the better. Each component comes with a warranty, return policy, etc. If a component fails to work or is not compatible, returns are easier the fewer the number of suppliers’ invoices.
PC building details – Order of installation
1. – Push the I/O shield into its space in the case so that it matches the arrangement of the ports on the motherboard. If applicable, install hard-disk and DVD drives into bays in the case. Install the RAM memory and, if you have one, install an M.2 SSD drive on to the motherboard.
2. – Install the motherboard. FYI, I always use MSI motherboards with AMD processors.
3. – Connect the necessary cables to motherboard from the power supply unit (PSU).
4. – Install the processor.
Connecting the front panel ports to their headers on the motherboard is a very fiddly business
5. – The CPU cooler. – Apply thermal compound if the cooler doesn’t come with it on its underside. Don’t forget to remove the tape covering the thermal compound. I always add thermal compound to what is on the cooler. It often comes with nitrile thimbles that you put on a finger to spread it evenly over the CPU. If not, I use a nitrile glove. Screw or attach it to the motherboard and connect its power cable to the fan header on the motherboard. For a screw-in cooler, don’t screw any of the four screws in all the way. Screw all of them in partially, going around them until they are all screwed in fully.
6. – Connect the front-panel-ports cables to their headers on the motherboard. A motherboard’s user manual provides diagrams showing their locations and which pins to connect with which cables. This can be a very fiddly business, especially if you have large fingers and especially with USB cables, which have four connecting cables within each cable. Be patient and never use force.
7. – The Power, Reset, Power LED and HDD LED cables have labels. The sides with labels face outwards on the pins to connect positive and negative pins correctly. If you get them the wrong way round, there will be no damage done, they just won’t work. The user manual provides warnings where necessary, such as with USB headers.
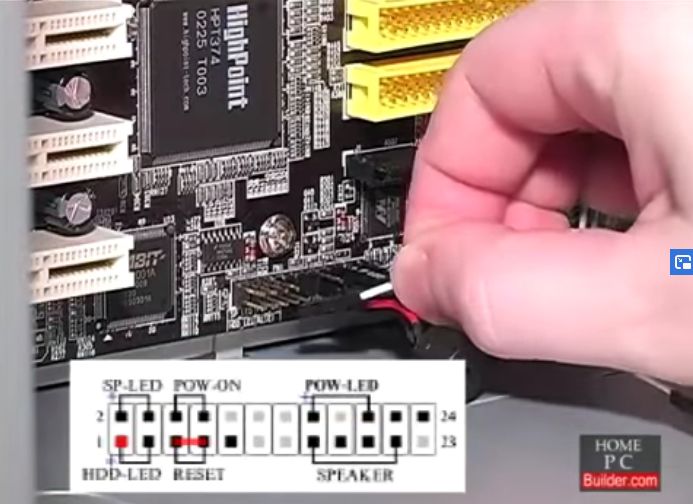
The motherboard user manual provides diagrams on header locations and which pins to connect with which cables.
8. – Connect any SATA hard-disk and DVD drives to the motherboard (data cable) and connect the drives to the power supply (SATA cables). If you are not using onboard graphics chip (built into the motherboard) or graphics that the processor provides, install the graphics card in its slot.
9. – Install Windows 10 or any other operating system by booting from the installation media (flash drive or DVD drive). The chosen drive must be set as the first-boot drive in the UEFI/BIOS. Windows 10 asks for its Product Key. Click on the option “I don’t have a product key. The setup will install Win10 and you can enter the key after Win10 is up and running. Windows will keep working without activation without a time limit. It only displays a notice above the notification area reminding you that Windows is not activated.
It is still possible to activate Windows 10 with a Win7 or Win8.1 Product Key
Windows 10 Product Activation – Believe it or not, you can activate it with a Win7 and Win8.1 Product Key but only if you own a retail licence. In fact, I have just used a Win7 retail key to do that on a new Win10 system. The Win10 version has to be the same version as the version of Windows from which the key belongs. The different versions of Windows have different keys. You cannot use a Win7 Home Premium key with Win10 Pro. You have to have a Win7 Pro key to activate Win 10 Pro. Unfortunately, Windows with an OEM key from a PC made by a manufacturer or system builder, which could be yourself, can only be installed on the original computer. Microsoft does not provide support for an OEM key, the builder – yourself, Fell, HP, etc. – does. That is why an OEM version of Windows is cheaper than a retail version. Therefore, it is a waste of time to phone Microsoft for support if your PC has a version of Windows with an OEM key.
PC building details – RAM memory compatibility is crucial

RAM memory compatibility is probably the biggest source of problems.
For example, you can buy an 8GB module of Crucial DDR4 memory from a supplier, such as Amazon, that turns out to be incompatible with a particular make/model of motherboard. Then, you can visit the crucial.com website, use its memory selectors – by make/model of device or by using an app download. The memory is guaranteed to be compatible or your money back. The memory you buy from the site is then almost always compatible, but the labelling of the two modules look exactly the same.
Without the RAM memory functioning, the system won’t boot into UEFI/BIOS
Without the RAM memory functioning, the UEFI/BIOS won’t boot, so you won’t be able to install Windows 10 or any other operating system in order to get the system up and running. In order to get a PC system system running, it requires memory, a processor and a graphics card. You obviously have to be able to see the graphics display that the BIOS and the operating system’s setup produce. It is not necessary to install a storage hard-disk or SSD drive in order to boot into the BIOS because it uses its own flash memory.
The seating of a single module in its slot can appear to be correct. However, if that is not the case, the system will only run the CPU fan and activate the DVD drive. Consequently, you will be thinking that the motherboard or the processor or the graphics card or all of them could be faulty. Always make sure that each RAM module must be held rigidly in the socket with the catch at either end engaging properly.
The consensus in the following forum thread is that memory is required for the system to boot the BIOS. As you have probably discovered, the main problem with forums is the number of clueless idiots who post in them.
Boot into BIOS with NO RAM? –
https://forums.anandtech.com/threads/boot-into-bios-with-no-ram.2443948/
SATA is dead – M.2 NVMe storage is the way to go
SATA hard disk drives and SATA SSDs are dead.
The only way to go, unless you want huge amounts of storage that a hard disk drive provides, is to use one or more M.2 NVMe SSDs. Some motherboards provide two M.2 NVMe slots. (The cheaper motherboards usually only have one such slot.) The NVMe cards run on the PCI Express (PCIe) bus, are four or more times faster (2100+ MB/sec) and are cheaper than SATA M.2 SSDs, which max out at 550 MB/sec, and are a little wider and longer than a stick of chewing gum. Currently (May 2020) a 250GB NVMe drive costs around £50. Strangely, a 500GB NVMe costs only about £10 more.
No need to use an antistatic wrist strap
As long as you hold circuit boards and cards around their edges without touching the electronics, there is no need to earth yourself with an antistatic wrist strap. I have built several PCs without doing that without ever destroying a component with a electrostatic discharge that has built up in my body.
Windows Update (Windows 10) is a reliable source of the latest device drivers
There was a time when device drivers installations from Windows update could screw things up. It was best to get the latest drivers from the component-manufacturers’ websites. Fortunately, Windows Update is now a reliable source of the latest drivers. If you are online during a Win10 new install, there is no need to make use of a device-driver DVD. Win10 installs all of the drivers for the PC and even connected peripherals, such as printers.
If the drivers for a device, such as a printer-copier-scanner, are not providing the full use of the machine, visit its manufacturer’s website support page, which usually provides access to user manuals, device drivers and BIOS updates.
Always keep the cover of the processor socket on a new motherboard
If a new motherboard has a cover over the processor’s socket, always keep it. Because if you have to send the motherboard back, you have to put it in the same state as it was when packaged or you render the warranty void.
The processor can only fit into its socket in one way. Read the installation instructions. Usually, you have to align a triangle on a corner of the CPU with a triangle on one corner of the CPU socket. Lift the zero-insertion-force lever and, correctly aligned, the CPU should just drop into its socket in such a way that it cannot be moved in any direction. Moreover, the printing on the CPU must read in the same direction as the printing on the motherboard.
The I/O shield has metal groundings that can prevent access to the ports
The I/O shield provides the holes that match the ports on the ports panel of the motherboard. You push it into place in its space in the PC case before installing the motherboard. Showing in the image below, the shield as little bits of metal around all of the port holes – groundings that are meant to come into contact with the ports, as they are pushed through, but not block them, which they can do if you don’t install the motherboard properly.
When the motherboard is in place in the case, check to make sure that there is free access to all of the ports. If you install all of the components and then discover that one or more ports are inaccessible, you’ll have to uninstall everything in order to get the blocking grounding(s) out of the way.