CONTENTS
This page – Introduction to the BIOS/UEFI BIOS
Page 2 – Using the standard BIOS ID number…
Page 3 – The BIOS beep codes…
Page 4 – Shutting Windows 8.1/10 down completely in order to enter the BIOS
Page 5 – The UEFI/EFI BIOS – including accessing/reflashing/updating information
Page 5 – Changing the boot order in a UEFI BIOS to enable booting from USB flash drives and CD/DVD drives
Page 6 – The standard BIOS – including the BIOS battery, setting the boot order of devices and reflashing/updating information
Page 7 – BIOSes are also capable of monitoring motherboard activities
Page 8 – The BIOS and overclocking
Page 9 – Common BIOS problems
Page 10 – UEFI/BIOS RAM memory settings taken from the BIOS section of motherboard’s user manual
POST – Use the ASRock BIOS update feature within the BIOS to keep it up to date
POST– BIOS beep code error – System boot failure is BIOS bug not hardware failure
POST – Use a USB flash drive to update/flash BIOS on MSI, Asus, Gigabyte, ASRock motherboards
POST – TPM chassis intruded BIOS fatal error message appears at system startup preventing boot
POST – High-end AMD motherboard and Ryzen CPU PC freezes due to automatic BIOS overclocking set by default
POST – Cannot boot from DVD or USB flash drive – Windows 8.1 & 10 – UEFI Secure Boot problem
POST – OCZ SSD drive not recognised by BIOS & Windows 7/8.1/10 install
Interesting Intel PTT (Platform Trust Technology) UEFI problem
PTT is Intel’s version of TPM (Trusted Platform Module). The person who had the problem solved it by updating the system BIOS.
Enabled Intel Platform Trust Technology (PTT) in BIOS – not showing up in Windows 10 –
Introduction to the BIOS/UEFI BIOS

This section of this website should provide the owners of desktop and laptop PCs with all of the information they need to know about the old-style standard legacy BIOS setup program that starts up from battery-powered flash RAM memory and the new UEFI/EFI BIOS that starts up from permanent, non-volatile memory that doesn’t use the motherboard’s battery when the computer is turned on, which then configures a computer’s hardware so that the operating system, mostly Windows, can recognise it and load its software device drivers.
If a computer uses an NTFS (MBR) file system, it will use the BIOS in standard legacy mode. This is because a BIOS in UEFI mode requires a boot drive that uses the later, more advanced GPT file system.
Note well that computer systems that support a UEFI BIOS require that the boot partition must be formatted to use the GPT file system. Boot drives that use the standard legacy BIOS can use an NTFS file system that uses a Master Boot Record (MBR) or a GPT file system.
The free EaseUS Partition Master provides an NTFS (MBR) to GPT Converter that makes the boot drive ready for Windows 11.
“If your disk is a data drive, you can convert it from MBR to GPT directly. However, if it’s a system disk, make sure your operating system and motherboard are supported to boot from UEFI mode before converting the disk to GPT since the system GPT disk can only be booted from UEFI mode.” – In other words, the system BIOS must support UEFI mode before you convert the boot drive to GPT. You perform the conversion to GPT and then when the system boots it will use its UEFI BIOS the next time it boots up.
The Compatibility Support Module (CSM) is a component of the UEFI firmware that provides legacy BIOS compatibility by emulating a BIOS environment, allowing legacy operating systems that do not support UEFI to be used. If the boot drive is formatted to use the NTFS file system, the CSM mode will be enabled by default.
What is CSM and do I need it enabled? –
https://rog.asus.com/forum/showthread.php?82326-What-is-CSM-and-do-I-need-it-enabled
The UEFI BIOS came into mainstream use when Windows 7 was current. Therefore, most current computers provide both UEFI and legacy CSM modes. The Secure Boot feature was introduced with Windows 8.
Also note that the Windows 10/11 feature, Secure Boot, is a feature of a UEFI BIOS, not a standard legacy BIOS. Windows 11 requires Secure Boot to be enabled (it can be disabled for Win10), therefore the system requires to be in UEFI mode, not in standard legacy BIOS mode. Moreover, a UEFI BIOS requires that the boot partition is formatted to use the GPT file system. So, you must make sure that the drive that you are upgrading or clean installing Windows 11 to is formatted to use the GPT file system.
Note that fully formatting a drive – to the same or a different format – destroys all of the data on it. Moreover, you cannot format a boot drive while it is operating the operating system. To do that you would have to use a boot disk, such as the Windows install disk. Therefore, you must make a backup or save the data and image files that you want to restore to the newly-installed operating system. All of the software will have to be reinstalled. Note that a system image backup restores the file system when it is restored because it is a full image of the system.
In other words, if you enable the BIOS to work in UEFI mode and the system is not using a GPT-formatted boot partition, the system will not boot and you will have to reset the BIOS by removing its battery on the motherboard or by discharging it by using a jumper setting. Read your motherboard’s user manual to find out what the methods of resetting its BIOS are.
Will Windows 11 run on your current Win10 computer?
Will Windows 11 run on your current Win10 computer? – A GPT file system boot drive is a requirement. A UEFI BIOS requires a GPT boot drive and only a UEFI BIOS supports Secure Boot and TPM 2.0, both of which are system requirements to upgrade from Windows 10 to Windows 11.
Do hard drives need a GUID partition table (GPT) to boot in UEFI mode –
https://itectec.com/superuser/do-hard-drives-need-a-guid-partition-table-gpt-to-boot-in-uefi-mode/
Windows 11 Without UEFI: Everything You Need To Know –
https://nerdschalk.com/windows-11-without-uefi-everything-you-need-to-know/
Entering/accessing the BIOS/UEFI BIOS
BIOS settings that the motherboard User Manual provides
The following page on the website of the major motherboard manufacturer, Gigabyte, provides an annotated image of a Gigabyte B550 AORUS MASTER (2020) motherboard plus other comprehensive and illustrated information. The User Manual provides full information on the BIOS settings. Unfortunately, I have noticed that the User Manuals from MSI and Asus no longer provide information about the BIOS settings, just information on how to access the BIOS and flash upgrade it. The advice given is to use the default BIOS settings.
https://www.gigabyte.com/Motherboard/B550-AORUS-MASTER-rev-10#kf
Download the User Manual for that Gigabyte motherboard yourself by clicking on the following link:
https://download.gigabyte.com/FileList/Manual/mb_manual_b550-aorus-master_1001_e.pdf
The following page on the website of the major motherboard manufacturer, Asus, provides an annotated image of an Asus PRIME B550M-A motherboard (2020 release) that runs up to the third-generation AMD Ryzen processors. Unlike the User Manual for the Gigabyte motherboard dealt with above, the User Manual for this Asus motherboard provides no information on the BIOS settings.
AMD B550 (Ryzen AM4) micro ATX motherboard with dual M.2, PCIe 4.0, 1 Gb Ethernet, HDMI/D-Sub/DVI, SATA 6 Gbps, USB 3.2 Gen 2 Type-A, and Aura Sync RGB headers support. –
https://www.asus.com/uk/Motherboards/PRIME-B550M-A/
Legacy BIOS
You access the standard legacy BIOS by pressing its access key at startup before the boot menu or Windows starts to load.. The startup screen says something like Press Del to enter SETUP, as shown at the bottom of the image below. It could be the F1 key or some other key.
UEFI BIOS
Most recent computers have a UEFI BIOS. Due to the extra-fast booting of current computers, you won’t be quick enough to succeed by pressing the entry key to enter the UEFI BIOS. You will probably have to access it by using alternative methods. All of those methods require being in Windows. The easiest method – while in Windows – is to hold down the Shift key while clicking on the Restart option. Alternatively, this is a click path – Windows 10: Start => Settings => Update & Security => Recovery => Advanced startup => Restart now => Troubleshoot => Advanced options => UEFI Firmware Settings => Restart. The computer restarts and provides the options to enter the UEFI during the startup.
3 Options to Access UEFI BIOS Setup in Windows 8 / 10 –
https://www.top-password.com/blog/how-to-access-uefi-bios-setup-in-windows-8/
Updating UEFI firmware – also known as flashing the BIOS
POST – February 2021 – – Use a USB flash drive to update/flash BIOS on MSI, Asus, Gigabyte, ASRock motherboards
December 21, 2018 – Note that the UEFI BIOS is updated by using firmware updates that are much more complicated than standard BIOS updates. Users used to get away without updating the old-style standard BIOS unless an update was required to fix a bug or add support for new hardware. However, the UEFI BIOS incorporates security features that require updating, often frequently due to the discovery of new security vulnerabilities. The implications are too involved to deal with on this page, so here is link to an article that does a good job.
Why Your PC’s UEFI Firmware Needs Security Updates –
https://www.howtogeek.com/399435/why-your-pcs-uefi-firmware-needs-security-updates/
Note that motherboard manufacturers often provide information under Support on why the BIOS has been updates – to fix bugs or to update security features, etc. If that is the case, you can find out the reasons for updates and decide if it is worth while updating.
For example, the link below provides the BIOS updates for an MSI B450M PRO M2 MAX motherboard and provides explanations about what the update fixes. If the fixes don’t apply to you and your system is working well, there is no need to flash that particular motherboard’s BIOS.
https://www.msi.com/Motherboard/support/B450M-PRO-M2-MAX#down-bios
The UEFI BIOS update procedure(s) vary between the major motherboard manufacturers
NOTE: If you are updating the BIOS manually by using a flash drive to boot the system and install the new BIOS, make sure that the you download the correct file for the make/model and the revision number (if applicable) of the motherboard. Installing the wrong update file could hose the system. You can find the make/model and revision number written on the motherboard itself.
Each motherboard manufacturer has its own UEFI BIOS update procedure(s). All of the major motherboard manufacturers provide user manuals as downloads for each of its models, usually in the PDF format. The user manual provides information on the available update procedure(s) and provides a section devoted to the BIOS settings.
You can use the free CPU-Z utility to identify the make/model of the motherboard and the version of the current BIOS. Then you can visit the motherboard manufacturer’s website, find its Support page for your model, which should provide information on the available BIOS versions and the downloads for the BIOS files.
CPU-Z – https://www.cpuid.com/softwares/cpu-z.html
Quick tips: How to Update Your BIOS [For a Gigabyte motherboard] –
https://www.youtube.com/watch?v=0qhFRWwc_YQ
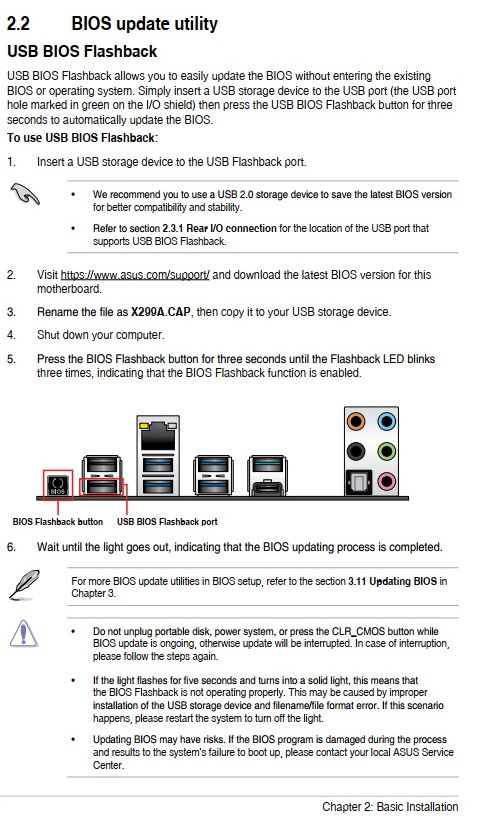
The image below is taken from the user manual of an Asus Prime X299-A motherboard.
The third-party developers of the new UEFI BIOSes are the same developers that created the Standard legacy BIOSes – AMI, Award, Phoenix, etc.
A standard legacy BIOS can be entered to examine or change before Windows starts to load by pressing its entry key, which is usually the Del or F1 key. An instruction on the startup screen says something like: “To enter setup press Del” or “DEL: Setup”. That entry method is also usually used by a UEFI BIOS, but that may not always the case because the UEFI can be entered from within Windows 8.1/10 by following a long click path and the motherboard manufacturer might want to make entry as difficult as possible. You should consult the PC’s user manual or its motherboard’s user manual for information on the UEFI. You can use the free CPU-Z utility to identify the make/model of motherboard and then visit the manufacturer’s website for the user manual, usually in the PDF format.
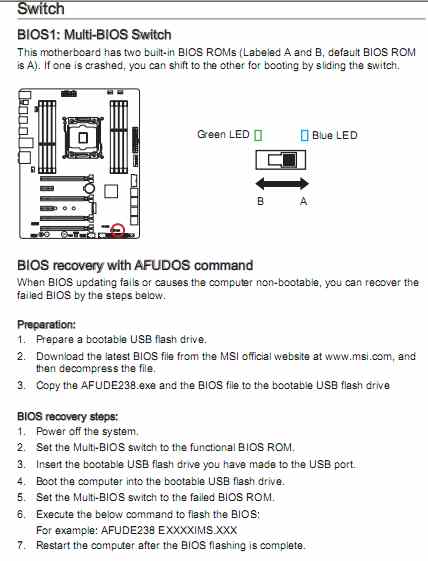
The image below shows that information provided by the user manual of a MSI motherboard from 2015. Click on the image to view its full size.
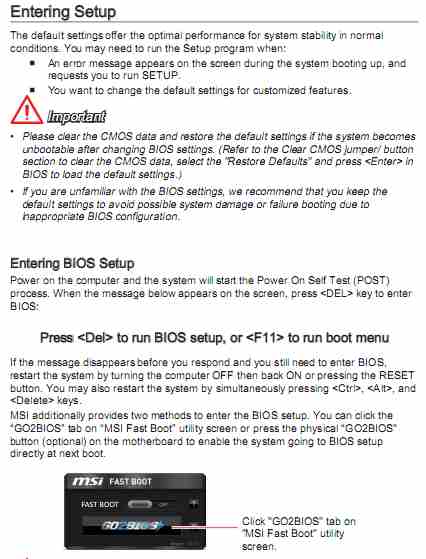
Some motherboards manufactured by MSI provide two UEFI BIOSes and a switch that allows switching between them. You should read your PC motherboard’s user manual to see what features it provides with regard to the UEFI/BIOS itself and other components.
The following Wikipedia page on the UEFI BIOS goes into great detail on it:
Unified Extensible Firmware Interface – https://en.wikipedia.org/wiki/Unified_Extensible_Firmware_Interface
Motherboard battery not used by a UEFI BIOS
Note that desktop and laptop PCs now store the UEFI settings in non-volatile permanent memory that retains information when the PC is switched off, which means that the UEFI does not require to make use of a battery supplied by the PC’s motherboard to retain its data. However, motherboards still have a battery because the Real Time Clock (RTC) that keeps date and time information has to be powered. The operating system takes its date and time from the RTC.
The UEFI is not accessed by pressing an entry key (Del, F1, etc.) at startup, it is accessed from within Windows 8.1 and Windows 10. The following short video shows the easiest but still very involved way in which to access the UEFI settings. UEFI access is much the same in Windows 8.1. Access has no doubt been made as difficult as possible so as to prevent users from screwing up their systems and then requiring support to come right.
The BEST Way to Access Your BIOS / UEFI (+ 3 Other Tips) –
Windows 8.1 and Windows 10 PCs use a UEFI BIOS (instead of a standard legacy BIOS) that can be set in UEFI or standard legacy BIOS mode. Here is information on how to do that if the UEFI makes it possible in the first place:
Set up the BIOS in UEFI or legacy mode –
https://help.ubuntu.com/community/UEFI#Set_up_the_BIOS_in_UEFI_or_Legacy_mode
Note that if you are using a wireless keyboard, it might not allow you to enter the BIOS. In which case, you’ll have to use a wired PS/2 or USB keyboard. Moreover, when a desktop or laptop computer starts up – boots – only certain USB ports might be active during the boot, so, if you are using a wired USB keyboard and you can’t access the BIOS, try using the other USB ports.
Windows 8.1/10 when pre-installed on a new computer always uses a UEFI BIOS. Information on how to access it is provided further down in this article. Computers using Windows 7 and earlier versions of Windows usually use a standard legacy BIOS. Here is a webpage that deals with the problem that its title describes:
Dual Boot Windows 7 with pre-installed Windows 8 on GPT-formatted hard disk and UEFI BIOS –
http://social.technet.microsoft.com/Forums/windows/en-US/…
Windows 8.1/10 is locked into its UEFI BIOS by something called Secure Boot that stops an unrecognised operating system or recovery boot discs from booting the system, which is a nuisance if you have to recover the system from a failure of some kind by using a recovery boot disc or the boot disc of another operating system, such as Ubuntu Linux, the installation disc of which can be used to run Ubuntu from its disc without installing it. The following post on this website deals with how to overcome this problem
How to recover a Windows PC from boot problems introduced by the replacement for the standard BIOS called the UEFI BIOS –
https://www.pcbuyerbeware.co.uk/blog/…
The different brand-name computer manufacturers and BIOS setup program developers use different keys or key-combinations to enter the standard BIOS. Visit this page if you need to know what the entry methods used by all of the main brands of PC and the major BIOS developers are:
_________________________________
BIOS problems
Common BIOS-related problems are dealt with in this article instead of having their own section, because there aren’t many of them. Most BIOS-related problems are fixed by either updating or resetting the BIOS, both of which are dealt with in this article. If you have enabled setting and the computer fails to boot, enter the BIOS and enable the optimised or fail-safe default settings option. The Reset Configuration Data setting makes the BIOS reconfigure the hardware. Click on Common BIOS problems to go to them.
_________________________________
Reflashing/updating the UEFI and standard legacy BIOS
Information is provided on both the decades-old keyboard-accessed standard BIOS and the new mouse, touchpad or tap-accessed UEFI BIOS, which is required for hard disk drives that have a storage capacity greater than 2.19GB.
Note that the settings that are made accessible in a UEFI/BIOS depend on the computer’s manufacturer or the motherboard’s manufacturer if you buy or build a PC and install your own motherboard. If the computer is made for gaming enthusiasts, for example, if will no doubt provide a full range of customisable BIOS settings, such as settings that allow the overclocking of the components, running them faster than their stock speed, whereas if it is made for the typical home user, the computer manufacturer will probably provide only the basic settings in order to prevent the user from messing about in the BIOS and causing problems that require solving from its expensive support staff. For that reason, most laptop and netbook computers usually don’t have a BIOS that allows much in the way of customisation.
Information on reflashing – upgrading – the UEFI/BIOS – is provided in this article in these pages:
Page 5 – The UEFI/EFI BIOS
Page 6 – The standard legacy BIOS
The contents of the standard legacy BIOS is held in flash memory, hence the name reflashing to upgrade it. If you are looking for information on reflashing the BIOS of a tablet PC, some of them have a standard PC-type BIOS that can be accessed and reflashed and others use inaccessible firmware of the same kind used by CD/DVD drives, network routers, etc., that can only be updated. The tablet manufacturer’s website should provide information on how to perform a reflashing. If not, some manufacturers provide email and forum support.
The BIOS setup program – an acronym for Basic Input/Output System – is currently still a vital part of a PC’s system, without which nothing can work. It was present in the first PCs made by IBM and is still in use in now (2014), more than 30 years later. The standard keyboard-driven BIOS configures the PC’s hardware so that the operating system (Windows, Linux, OS X, etc.) can recognise all of it and install the appropriate software device drivers. The program itself is stored in a CMOS flash memory chip on the motherboard and it can be upgraded by reflashing the memory chip with the update according to predetermined procedures. However, the standard BIOS has been replaced in new computers by a mouse-driven Unified Extensible Firmware Interface (UEFI) BIOS, also known simply as an EFI BIOS.
Other useful information about the UEFI BIOS
Development of the UEFI BIOS was started by Intel in the mid 1990s. Windows PCs started using the UEFI BIOS, which is the replacement for the decades-old standard BIOS, with the release of Windows 8 in 2012, so most desktop and laptop PCs bought new since then use a UEFI BIOS.
The standard BIOS, stored in a flash-RAM chip, boots before Windows to run the Power On Self Test (POST) that checks that the hardware components are functioning and configures those components for Windows so that it can load their software device drivers.
The standard BIOS of a PC can provide many configuration settings, depending on how many the desktop or laptop PC manufacturer is prepared to allow. The manufacturers of laptop and desktop PCs used for office work usually prefer to have the BIOS or UEFI as limited (or difficult to access, as in the case of the UEFI BIOS) as possible in order to prevent users from getting into the kind of trouble that requires costly customer support.
However, PCs or motherboards or laptops bought by power users usually have a BIOS or UEFI that provides the customisation settings that such users are likely to want or need, such as those that allow the processor and RAM memory to be run at higher frequencies than their stock frequencies (to be overclocked), either by enabling settings manually or enabling automatic settings.
The early versions of the UEFI BIOS used in PCs running Windows Vista were more or less the same as the standard BIOS but with mouse operation instead of the keyboard-only operation of a standard BIOS. All devices require a device driver to operate, so the keyboard and mouse drivers have to be loaded by the BIOS/UEFI itself in order to be used. The flash-RAM chips of the standard BIOS were of small capacity due to the cost of flash-RAM, so only keyboard navigation was used.
Windows 7 PCs came with a more developed UEFI BIOS that allowed access to the settings while running Windows.
If you are still using Windows 8.0, you should upgrade to version 8.1 in order to be able to get patches and security updates, because Microsoft only supports Win 8.1. You can also upgrade to Windows 10 Home or Pro editions in 32-bit or 64-bit versions that match your qualifying edition of Windows 7 SP1 and Windows 8.1 if your computer passes the hardware tests that Microsoft’s Windows Update site performs on it. The upgrade to Windows 10 was free until July 29 2016. Now the Windows 10 Home and Pro 32-bit and 64-bit versions have to be purchased. Have a look on Amazon for pricing and purchaser reviews.
Windows 8.1 and Windows 10 make as much use of its UEFI as the manufacture is prepared to provide, such as providing startup protection from rootkit infections. Rootkit infections operate under Windows, so require special software to detect and remove them that can be updated like anti-malware scanners.
Some malware scanners have built-in rootkit scanning, such as the Malwarebytes free and Pro-version scanners. The free scanner has to be run manually and does not monitor a system in real time.
Unfortunately, UEFI protection is intrinsically bound to the installation of Windows 8.0/8.1/10, thereby making it problematic to boot the system with another operating system’s boot disc (for example, Ubuntu Linux can be run from its boot disc or be installed on the system) or to run system-boot recovery/repair discs created by third-party developers. The UEFI protection setting called Secure Boot prevents that from happening unless the boot disc has a digital signature from Microsoft that gives it a pass or Secure Boot is disabled.
Cannot boot from DVD or USB flash drive – Windows 8.1 & 10 – UEFI BIOS Secure Boot problem –