
The days are long gone when it was a dodgy but necessary business to use a floppy disk and drive to update/flash the BIOS of a make/model of motherboard. When a failed update could render your computer completely useless, requiring the motherboard to be sent to its manufacturer for repairs.. The update could fail if using the wrong or a corrupt BIOS file, a dodgy floppy disk or drive, or a power cut during the updating process.
Only a power cut can render a computer useless during a BIOS update
Now, due to improvements in the updating software, only a power cut can render a computer useless during a BIOS update.The software can detect if the BIOS file is wrong, corrupt or there is something wrong with the flash media.
For example, I tried unsuccessfully to use an old USB flash drive (15 years old, FAT32 file system) to perform the update, using the front USB port of an ATX case of the same age. The system would not perform the update. All of the other components were brand new. Which means that the USB 3.2 headers on the new motherboard were connected to USB 2.0 cables running from the front of the old case. Fortunately, the update was successful when done using a USB 3.2 flash drive (using the FAT32 format) and a USB 3.2 motherboard port on the back of the case. In short, you should use recent hardware to update/flash BIOS.
There are several ways to update a BIOS. Using a live-update feature that you download and install and flashing the BIOS with the update using a USB flash drive are the two most popular methods. My favourite is the flash-drive method.
The steps taken to update/flash BIOS of an MSI B450M Pro M2 MAX motherboard
1 – What follows is how I found and applied the latest BIOS update for the MSI B450M Pro M2 MAX motherboard.
Use the free CPU-Z tool to identify the existing BIOS in use by that motherboard. In my case, it was the AMI BIOS A.50 version.
Look under the Mainboard tab. The image below shows the BIOS version after the update – A.80.
Note that you can also use CPU-Z to identify the motherboard (mainboard) that a desktop PC is using in order to be able to visit the motherboard manufacturer’s website that provides BIOS and all other updates. If you want to update the BIOS of a laptop computer, visit its manufacturer’s website (Dell, HP, etc.)

Update/flash BIOS – Obtain the latest BIOS file from the msi.com website
2. – Obtain the latest BIOS file from the msi.com website. The process is similar when using the website of any other motherboard manufacturer – Asus, Gigabyte, ASRock, etc.
Enter the exact make/model of the motherboard plus the word BIOS in a search engine – msi b450m pro m2 max bios.
The most direct link that comes up is https://www.msi.com/Motherboard/support/B450M-PRO-M2-MAX
That link goes straight to the support page (see the image at the top of this page) that provides the update to download. The latest BIOS update was a beta test version. Best to avoid betas because they are still undergoing testing. The next update was A.80, which is three updates up from the A.50 BIOS file that was in place. The update page usually tells you what each of the updates fixes, updates or adds.
Update/flash BIOS – Download the BIOS file that usually comes in a zip file
3. – On the support page for the MSI B450M Pro M2 MAX motherboard, the download of the BIOS zip file downloads to the Windows 10 Downloads folder when you click on the red circle with a red arrow pointing down within it.
To open the Downloads folder, click on the Start button in Windows 10, click on Documents. That folder opens. Now find and click on Downloads (down the left side).
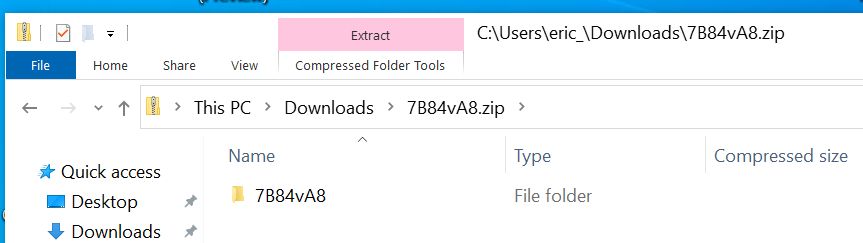
The file in my Downloads folder had the name 7B84vA8. zip. – 7884 is the code name of the MSI B450M Pro M2 MAX motherboard and the A8 stands for the A.80 BIOS update.
Only the BIOS file has to be copied and pasted to the USB flash drive
Click on the zip file to open it. The image below shows what came up. The 7B84vA8 folder contains two files – a .txt text file and the BIOS update file – E7B84AMS.A80. You have to highlight and then copy and paste only that BIOS update file to an empty USB 3.x flash drive that is formatted to use the FAT32 file system. The .txt file. is not necessary.
It is best to use an empty flash drive so that the software that does the flashing does not have to search through many files in order to find the BIOS file. You should also not use a very high-capacity flash drive. Best to use one with a low capacity of 4-to-8GB if you have one. If not, use a 16-to-32GB drive. The reason being that, where possible, you don’t want to put too many demands on the flashing process. Older systems might not perform the update with a large -capacity drive. The MSI motherboard was brand new when I did the update and it went through perfectly using a 32GB flash drive.
To format the flash drive click on Start => Documents. The flash drive appears at the bottom of the left-hand side of the window along with the main C: drive and any other drives in the system. Left click on the flash drive. Choosing the Format option on the menu that comes up allows you to choose the files system – FAT32 or NTFS. Choose the quick format option and allow the process to run to the message that comes up that indicates when the formatting is over. Now you can paste the BIOS file to the flash drive.
Open the 7B84v8 folder shown in the image above to reveal its two files and then highlight and copy only the BIOS file. In this case it is E7B84AMS.A80. Next, click on it to open the flash drive’s window and past the BIOS file into it.
Now you are ready to update the BIOS
In Win10, click on the Start button => Power button => Restart to restart the system. The MSI motherboard uses the Del (Delete) key to open the BIOS after a restart or at startup. If you are starting the system up from cold, just keep, pressing the key that opens the BIOS – Del, F1, etc. The motherboard user manual that you can download from its manufacturer’s website provides all of the technical information on the make/model of board. I notice that only expensive motherboards tend to come with a full user manual. Being an inexpensive m-ATX motherboard, the MSI B450M Pro M2 MAX did not come with one in its box.
Below are the instructions from the user manual using a flash drive and the live-update methods.
NOTE: You must leave the process completely alone until it finishes. Some updates reboot the system several times. This particular MSI BIOS came out of the BIOS and went straight into Win10.
Updating BIOS with M-FLASH
1. Press Del key to enter the BIOS Setup during POST.
2. Insert the USB flash drive that contains the update file into the computer.
3. Select the M-FLASH tab and click on Yes to reboot the system and enter the flash mode.
4. Select a BIOS file to perform the BIOS update process.
5. After the flashing process is 100% completed, the system will reboot automatically
Updating the BIOS with Live Update 6 and update by using Windows 10
1. Install and launch MSI LIVE UPDATE 6 [Obtain it from the MSI website]
2. Select BIOS Update.
3. Click on Scan button.
4. Click on Download icon to download and install the latest BIOS file.
5. Click Next and choose In Windows mode. And then click Next and Start to start updating BIOS.
6. After the flashing process is 100% completed, the system will restart automatically.