Device Manager in Windows XP, Vista, 7, 8.1 & 10: Information and solved problems
CONTENTS
All of the information provided here on the Device Manager is on a single page. Click a link to go to that specific information or scroll down the page.
- – Top – Introduction to the Device Manager
- – The Device Manager in Windows 10
- – The Device Manager in Windows 8/8.1
- – The Device Manager in Windows XP/Vista/Windows 7 SP1
- – Windows Device Manager Error Code Lists
- – Problem: No devices listed in the Device Manager in Windows 7 Home Premium
- – Problem: The Device Manager won’t open
- – How to fix Device Manager hardware errors – A red cross (X) or a yellow exclamation mark (!) beside the device’s entry
- – Windows: Unsigned drivers
Introduction to the Device Manager
The Device Manager started in Windows 95 and has remained pretty much unchanged through the different versions of Windows – Windows 98, Windows Me, Windows XP, Windows Vista, Windows 7, Windows 8.1 and Windows 10 (the latest versions).
The easiest way to open the Device Manager in any version of Windows is to press the Windows key plus the R key that brings up the Run box and enter devmgmt.msc in it, which brings up the Device Manager.
To see any hidden devices, open the View menu, shown in the image below, and enable Show hidden devices.There are several hidden devices. I have never experienced any problems with them.
The image below shows the menu options made available when the entry, under Network adapters, for the Intel Wireless Pro internal wireless 802.11g network adapter of a laptop is right-clicked on. The laptop also has an 802.11n USB Wireless LAN Card connected to one of its USB ports. Both wireless network adapters are disabled and the Realtek PCIe GBE Family Controller, a cabled Ethernet connection, is being used to connect the laptop to an ADSL broadband modem router. You should only use one type of connection – one Ethernet or one Wi-Fi adapter – to connect to the web.

Device Manager – http://en.wikipedia.org/wiki/Device_Manager
Windows – Troubleshooting Hardware Issues with Device Manager –
https://kb.wisc.edu/page.php?id=30752
The Windows Device Manager is the utility that (by default) displays all of the devices that are vital to the system configuration that were detected at system start-up and for which Windows has loaded the device drivers. It provides a very useful summary of these devices and indicates where there are problems. The information is dynamic and it is recreated every time the computer starts. You can uninstall the driver of a device, disable or enable a device, roll back to a former device driver or update the device driver for a particular device if the computer is online.
Note that if you uninstall a device’s driver, by right-clicking on the device in Device Manager and choosing the Uninstall option, that driver will be reinstalled from the driver library when the computer is rebooted. No driver is ever deleted, just uninstalled. Doing that is often a way to cure a driver problem. A corrupted driver is uninstalled and then reinstalled by Windows during the next startup.

The Device Manager (DM) can conceal installed devices that could be the cause of problems, but they can be revealed. In Windows 7 to 10, DM is in the Control Panel, but there are several other ways of accessing it, some of which are illustrated further down in this article. To reveal hidden devices, open DM, open the View menu and click on the Show hidden devices option. I have never had any problems with the hidden devices.
When there is a problem with a device the following happens. A yellow exclamation mark (!) beside the entry for a device indicates that although there is a problem with it, it might still be functional. A red cross beside a device’s entry means that the device is set as disabled, or has been disabled by Windows. Right-click on its entry to reactivate it.
If a device or function that is needed isn’t working properly, usually with the Device Manager showing a red-X error icon, it would, of course, be worth spending time fixing it. However, yellow exclamation marks usually involve non-critical, technical issues having no negative effects on how the computer is functioning. Therefore, it makes sense to ignore a yellow icon if right-clicking on and uninstalling the device and allowing Windows to reinstall it during the next boot process doesn’t fix the problem.
The DevCon command-line utility functions as an alternative to Device Manager –
After you plug in a USB device that gets ignored, run this program. The ‘rescan’ option causes the system to rescan the USB ports, which usually results in a USB device being acknowledged and becoming usable. –
http://support.microsoft.com/kb/311272
The Device Manager in Windows 10
The Device Manager in Windows 10 is much the same as it is in Windows 7 and 8.1. The quickest way to open it is to type device manager in the Search… box and then click on the link provided that opens it as shown in the image below. Alternatively, right-click on the Start button and choose it from the long list of other options. Another way is to press the Windows key plus the R key and enter devmgmt.msc in the Run box that presents itself. You can find most of what you are looking for in Windows and on the web by entering an appropriate search query in the Search box.

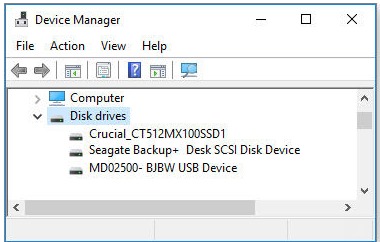
The image below shows the disk drives listing in Windows 10 for three storage drives. The first drive is an internal Crucial SSD, the second is an external USB Seagate drive and the third is also an external USB drive, the manufacturer of which is not shown because it is using Windows generic device drivers, not its manufacturer’s drivers. Note that generic drivers can cause a failed connection problem because the drivers can’t get through the USB sub-system. The device manufacturer’s drivers are less likely to be the cause of a connection problem.
The Device Manager in Windows 8.0/8.1
The Device Manager in Windows8.1, as in Windows 7, is in the Control Panel. If you are on the Start screen, just type the word device or device manager. A new screen presents itself showing no link to it because it is set to search Apps. What you typed appears in the Search box, so select Settings and a link to the Device Manager appears on the left-hand side.
The easiest way to open the Device Manager in any version of Windows is to press the Windows key plus the R key that brings up the Run box and enter devmgmt.msc in it, which brings up the Device Manager.
You can find any application or tool by typing its name while on the Start screen, so a Start button is unnecessary. It will either be under Apps or, as with the Device Manager, be under Settings.
If you press the Windows key (the one with a flag on it) plus the X key while on the Start or Desktop screens, a menu comes up containing options that provide access to the Control Panel and the Device Manager, plus plenty of other useful options, shown in the image below.

The image below shows the Device Manager in Windows 8. It has remained more or less the same since Windows XP. The names of most of the devices are self-explanatory. The IDE ATA/ATAPI controllers govern the use of IDE hard disk and CD/DVD drives. The IEEE 1394 host controller controls devices that use the FireWire serial interface that a competing with USB for years until SuperSpeed USB 3.0/3.1 left it for dead. FireWire devices are rare nowadays. If you don’t know what a listed category is for, use its name as a web-search query.

The Device Manager in Windows XP/Vista/Windows 7 SP1
Windows XP, Windows Vista and Windows 7 all have a Device Manager. To open it in XP, enter devmgmt.msc in the Start => Run box. Use the Search… box in later versions of Windows. The Device Manager appears in the Control Panel as an item in Windows Vista and Windows 7. There are several ways to open it. The quickest method in Windows 7 is just to type the word device in the Start => Search box and click the link called Device Manager that is presented.
If you can remember the command, the easiest way to open the Device Manager in any version of Windows is to press the Windows key plus the R key that brings up the Run box and enter devmgmt.msc in it, which brings up the Device Manager.
When you open a device category by clicking the + sign beside it, and then open a device, under its Driver tab you’ll see the Roll Back Driver option. If a device driver is the cause of a problem, you can use the Roll Back Driver feature to restore the system to the state it was in before you installed the driver.
Windows – Troubleshooting Hardware Issues with Device Manager –
https://kb.wisc.edu/page.php?id=30752
This page linked to above is updated. At the time of writing, it covered the Device Manager from Windows XP to Windows 8. It will probably be updated to Windows 10 at some time.
Windows Device Manager Error Code Lists
The error codes probably stay the same from one version of Windows to the next. That said, I could not find an equivalent article – the one linked to below covers Windows XP – covering the Device Manager error codes in Windows Vista, 7, 8, and 10 so, if you need to find out what a particular error code is all about, search for it here: http://support.microsoft.com/search/.
Device Manager Error Codes – A complete list of error codes reported in Device Manager –
http://pcsupport.about.com/od/fixtheproblem/tp/device_manager_error_codes.htm
Problem: No devices listed in the Device Manager in Windows 7 Home Premium
The information in this Q&A can be applied to Windows XP and Windows Vista.
Problem
When I open the Device Manager in Windows 7 Home Premium 32-bit version, it doesn’t show any devices – it is empty. Here is what I have tried unsuccessfully, as recommended on the web: Plug and Play is set to automatic in the BIOS – ran the System File Checker (SFC) – at the top of the list in Device Manager, where the name you gave to your computer has a + sign to the left of it – clicked that to expand the tree. I don’t want to use System Restore to restore a restore point made prior to the problem, because I don’t know when the problem started because I don’t go into the Device Manager very often. I only did so because of an error message on my desktop related to the computer’s AMD graphics cards. I went into Device Manager to see what was wrong with it.
Answer
I would try using System Restore first by choosing the oldest available restore point. According to reports on the web doing that doesn’t usually work. The only other ways to get the Device Manager back is to restore a backup or system image or perform a clean installation of Windows – if you have a Windows 7 installation disc.
If you don’t have a backup, system image or installation disc, you might have a Recovery Disc that the computer manufacturer provided or that can be downloaded or purchased that sets the computer back to the state it was when it left the factory. If you have the original Win7 disc, you will have to install Service Pack 1 (SP1) and all of the subsequent updates which can be done by using http://update.microsoft.com/ or by waiting for Windows to install the updates automatically, which is its default setting in Windows Update in the Control Panel.
This problem shows how important it is to make regular backups, which in Windows 7, using its Backup and Restore, which can be a regular backup, a regular backup plus a system image or just a system image. To restore a backup or system image requires booting the system with a Repair Disc that you create within Win7.
Problem: The Device Manager won’t open
Occasionally, the Device Manager won’t open with a message saying something like: “mmc.exe unable to locate component failed to start because apphelp.ddl not found. Try reinstalling.”
You can try using all of the several available ways of opening it, including entering devmgmt.msc in the Run box (XP) or Search box (Vista/Windows 7), which probably won’t help, because it looks as if the problem has been caused by file corruption, so try taking the following actions in this order:
1. – Use System Restore, available in Windows XP, Vista, Windows 7, to restore a restore point with a date that precedes the problem.
2. – Use the System File Checker (SFC), available in Windows XP, Vista, Windows 7 and 8 from a Command Prompt (with Administrator privileges in Vista/Win7/Win8), entering the command sfc /scannow, which should repair any corrupt files . In Windows XP, to open a command prompt enter cmd in the Start => Run box. You might be required to load your Windows XP installation CD/DVD if the i386 folder is not present in your installation. In Windows Vista/Windows 7/8/8.1, you need to open a Command Prompt with Administrator privileges, which is done by clicking Start => All programs => Accessories => Command Prompt, right-clicking with the mouse on Command Prompt and then clicking on Run as Administrator.
Use the System File Checker tool to repair missing or corrupted system files –
http://support.microsoft.com/kb/929833
3. – Use the other system recovery options available to your version of Windows that are provided on this website.
If you can’t boot into Windows in normal mode because of a problem, which might be caused by the installation of a new driver file, press the F8 key repeatedly after the BIOS information shows but before Windows starts up, and choose to start Windows in Safe Mode from the boot menu that presents itself. This works in Windows XP, Vista and Windows 7 systems.Search for an article called: How to boot into Safe Mode using Windows 8 and how to boot into Safe Mode from within Win8 – on this website by using its Search box.
You can then open the Device Manager as usual and remove the problematic device so that Windows re-installs the software device drivers it has in its driver library.
Downloaded drivers are not added to the library of drivers that were copied from the Windows CD or DVD, which Windows draws from when it installs drivers. You have to install downloaded drivers by executing their files, or by pointing Windows to their files instead if Windows asks for its CD/DVD to be loaded so that it can search its driver library.
There is also a (F8-key) boot-menu option called Enable VGA Mode that can be used to load the standard Windows VGA video card driver should a new version of the video card manufacturer’s drivers cause problems.
How to fix Device Manager hardware errors – A red cross (X) or a yellow exclamation mark (!) beside the device’s entry
The Device Manager can show error states for hardware devices in all of the versions of Windows from Windows 95 up to Windows 8.1 and will no doubt also do so in Windows 9 when it is released.
It is a common experience for one reason or another to open the Device Manager to find that there are one or more categories of device already expanded because the device is in an error state. An example is: under IDE/ATAPI controllers (for IDE hard-drive controllers) the device Primary IDE Channel (the description can vary) has a red X through it, which, when opened, says “This device is not working properly because a device it depends on – Standard Dual Channel PCI IDE Controller – has been dynamically disabled and consequently the hard-disk-drive controller has a yellow exclamation mark (!) through it.”
This kind of Device Manager error is most commonly caused by corrupt or incompatible software that has misused the hard-drive controller, which was then left in an error state.
Whenever errors such as those two involving a red X or a yellow exclamation mark against a device in Device Manager, the fix is most often easily achieved by uninstalling the hardware from within the Device Manager. Physical removal of the device is not required. By uninstalling a device, Windows is made to forget what it knows about the hardware in question and consequently it has to rediscover that information. Since Windows from Windows 95 to Windows 8 is a plug-and-play operating system, it detects any unknown hardware device automatically and attempts to install its device driver.
The process is relatively quick, involving just an uninstall and a reboot, but it can resolve many problems caused by corrupt device drivers and the use of incompatible software.
To open Device Manager in Windows XP just enter the devmgmt.msc command in the Start => Run box. In Windows Vista, enter that command in the Start => Start Search box. That command also works in Windows 7. In Windows 8/8.1 just type the word device on the tiled Start screen and you will be provided with a link that opens it. You can then pin it to the Desktop taskbar. You can also search for control panel, click its link and pin it. The DM is an item in the Control Panel.
Next, right-click the item in Device Manager that is showing an error and select Uninstall from the menu that presents itself. The image below is of the Device Manager in Windows 8.1, showing the right-click options on the Ethernet network driver.
Now all you have to do is close the Device Manager and reboot/restart the system. Windows will re-detect the unknown hardware that you uninstalled and reinstall a fresh copy of its drivers. If doing this doesn’t work, there is something more serious wrong with the device, such as an irredeemable failure.
Windows: Unsigned drivers
Installing a new driver file in Windows since Windows XP might make the unsigned driver warning pop up.
If its System Restore feature is enabled, Windows creates a restore point whenever you install an unsigned driver, which, if you don’t already know, is a software program that controls a hardware device but which hasn’t been certified by the Windows Hardware Quality Labs (WHQL) at Microsoft as being Windows compliant, and is therefore not digitally signed as such. The restore point allows Windows to be restored to the state it was in at the moment when the restore point was created.
Most people pay no attention to this warning and make Windows install the driver. Nine times out of ten there won’t be any problems with the driver, but it might not be your lucky day, so it’s best to make sure that the System Restore feature is enabled so that Windows automatically creates a restore point before installing an unsigned driver. It is enabled by default, but here are several ways that the System Restore feature can be turned off without your knowledge, by, say, malware, so don’t take it for granted that a restore point will automatically be created. Moreover, it is common occurrence for System Restore to fail to restore restore points, so a user should always have a recent backup or system image that can be restored.
Microsoft has provided several ways in which to verify if device drivers are signed or unsigned in Windows.
The first method is to go into the Device Manager. Double-click on the new device that has just been installed, open the Driver tab in the window that comes up and check the Driver File Details. If the driver is signed you should see: Digital Signer: Microsoft Windows Hardware Compatibility.
The second method is to go to the Start => Run (XP) box (the Search… box in Windows 7and enter sigverif. In the window that opens, click on Advanced to open the Advanced File Signature Verification Settings dialog box. Click on Look for other files that are not digitally signed.
How to identify unsigned drivers using sigverif utility in Windows 8 | 7 –
http://www.thewindowsclub.com/identify-unsigned-drivers-sigverif-windows
The third method is to open the Start => Run or Search… box and enter C:\WINDOWS\SYSTEM32\DRIVERS and then click on OK. [C:\ is the default drive where a Windows installation is located. Use the correct letter if Windows is installed on a different drive.] A window containing driver files opens. Look for the unsigned drivers that have the modified date when you first installed the new device. Once you have been able to identify the driver files, you can then take steps to resolve the driver-related problem by downloading the latest signed drivers from Microsoft or the device manufacturer’s site, removing the device in Device Manager, and then installing the new driver file.