Windows 10 does not create a Repair Disc, only creates a USB Recovery Drive
This post deals with how to create a Recovery Drive in Windows 10.
Most PC users know that Windows Vista/7/8.1 can create a Repair Disc (CD/DVD) that provides recovery tools and the ability to restore backups and system images.
Windows 10 no longer creates a rescue CD/DVD disc, it creates a Recovery Drive instead that uses a USB flash drive, which provides the recovery tools that most users of Windows 7 and 8.1 are familiar with – System Restore, Startup Repair and Reset Windows. Note that Windows 10 no longer provides the Refresh option that Windows 8.1 provides.
If it has the required storage capacity, the rescue drive is now able to store the Windows system files so that they can be restored.
Creating regular backups/system images is the best recovery option
Note that if you create regular backups and/or system images using Windows Backup and Restore, or a free third-party alternative, such as Macrium Reflect, and save them to an external hard disk drive (large capacity drives are now very affordable), it will be much less likely that you will need to make use of a Recovery Drive. That said, PC users have a tendency not to create backups at all or regularly, because they don’t want to buy an external hard disk drive or because they are just too lazy to make the effort. It is possible to save system backups to recordable DVD discs, but more than one is required and if just one disc fails to function, the backup can’t be restored.
How to create a Recovery Drive in Win10
To create a Recovery Drive in Win10, you need a USB flash drive with a capacity of at least 512MB (half a GB), but a drive of 8GB+ is required to have access to the full set of recovery tools. it is not possible to restore Win10 from a low-capacity 512MB flash drive; a drive with a capacity of 8GB+ is required for the Recovery Drive to be able to use its “Back up system files to recovery drive” option that makes possible the restoration of Win10 from the drive.
Here is how to create a Recovery Drive. Insert your flash drive into a USB port, type Recovery Drive into the Search box. Click on the top link called “Create a recovery drive” (sub-heading: Control Panel). Give the User Account Control (UAC) interruption permission to go ahead. This is what the next window (see an image of it below) that presents itself says: “Even if your PC can’t start, you can use a recovery drive to reset it or troubleshoot problems. If you back up system files to this drive, you’ll also be able to reinstall Windows.”
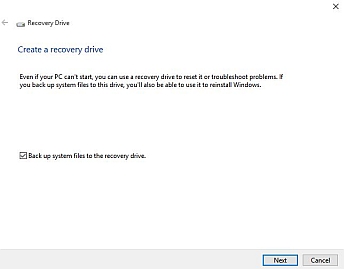
There is a check-box option called “Back up system files to the recovery drive”, which is enabled by default, but, as previously mentioned, you need to have a flash drive with a capacity of 8GB+ to make use of that option and have all of the recovery tools at your disposal. Disable that option if that is not the case.
Depending on how fast your PC is, if you have let the system files be included, it takes a relatively long time for Windows to create the Recovery Drive.
It is advisable to wipe and recreate the drive periodically so that it includes Windows updates, especially after a Service Pack has been installed, otherwise, after you have used the drive to restore Win10, Windows Update will have to reinstall all of the updates and missing Service Packs.
You should put a label on the completed drive so that you don’t use it or wipe it accidentally and be sure to put it somewhere you’ll remember if the time comes to use it.
It is advisable to make sure that the Recovery Drive works by booting the system with it. You can start the process of restoring the system files but cancel the operation as soon as you know that it is working but before it starts the reinstallation. You can also test the recovery tools in the same way.
Secure Boot setting in a UEFI BIOS prevents unrecognised boot media from working
The New UEFI BIOS that new PCs bought with Windows 8.0/8.1 and Windows 10 installed use, has a feature called Secure Boot that prevents unrecognised boot media from working. To solve that problem if it strikes, you have to switch to using the legacy BIOS mode provided by the UEFI BIOS, if it provides one, or disable Secure Boot in the UEFI BIOS.
Moreover, the standard old-style BIOS or the UEFI BIOS has to have the CD/DVD drive or the USB device (flash drive) set as the first boot device in the order of boot devices in order to be able to boot from a DVD or USB flash drive. You can leave having either of those devices as the first boot device, because if Windows doesn’t find the one set as the first boot device, it looks for the device set as the second boot device, which should be the hard disk or SSD drive on which Windows is installed. Visit the following page for information on the UEFI BIOS in the section of this website on the standard, old-style BIOS and UEFI BIOS.
The UEFI/EFI BIOS –
https://www.pcbuyerbeware.co.uk/the-pccomputer-bios/5/
After you have successfully booted the computer with the drive, you have to choose the type of keyboard to use. I choose the standard UK keyboard layout.
After that, a windows comes up presenting three options – Continue (Exit and continue to Windows 10) – Troubleshoot (Reset your PC or see advanced options) – Turn off your PC. You need to choose Troubleshoot, which provides another three options – Reset this PC – Recover from a drive (this is the one you need to choose – Advanced options, which provides the recovery tools – System Restore – System Image Recovery – Startup Repair – Command Prompt – Go back to the previous build, which allows you to go back to your previous version of Windows within 30 days of installing Windows 10, if you haven’t deleted the Windows.old folder that contains all of the required files to do so.
Note that to use System Restore from any level in Windows 10, the user has to enable it, because it is not enabled by default. Microsoft obviously wants users to use the Reset this PC options instead.