How to install a motherboard in the case & choices of processor & cooling units
Installing the motherboard in the case is very easy. The motherboard comes with standoff screws that screw into specific points on a slide-out plate in the case that match insulated holes in the motherboard. The motherboard is then screwed into the standoff screws with other screws that are also supplied. You have to make sure that the ports on the motherboard appear through the ports panel at the back of the case, so the metal covering on each of the port holes have to be removed. Read the information on the motherboard supplied by this site on this page:
https://www.pcbuyerbeware.co.uk/hardware/motherboards-cases-psus/
How to install the motherboard (mainboard)
If you are looking for advice on making a choice of motherboard, the following article is a good place to visit. Note that both AMD and Intel have released many new desktop CPUs since that article was written, but the principles of motherboard selection remain the same.
Best Of Tom’s Hardware: Beginner’s Guide To Motherboard Selection : Which Features Matter Most To You? [February 2010] –
http://www.tomshardware.co.uk/best-motherboard-guide,review-31808.html
Note that USB 3.0 (SuperSpeed USB), which first became available in November 2008, is not dealt with in the article linked to above, probably due to its slow takeup, itself due to the fact that only external (Solid State Drives) SSD drives, which are an alternative to an external hard disk drive, can benefit from using it. Internal SSD drives use the same SATA standard as internal hard disk drives.
The actual installation of the processor in its motherboard socket and the motherboard itself is easy in both tower (vertical) and desktop (horizontal) cases.
No special tools are required to install a processor, a suitable flat-ended screwdriver can be used to fit the cooling unit, and the only tools you need to install a motherboard is a standard Philips screwdriver – and nimble fingers. A pair of tweezers comes in handy to remove and replace jumpers on the motherboard, and to set hard disk drives as master or slave devices. If used, DIP switches can be set with a small screwdriver, or the tip of a ball-point pen or pencil.
Note that most recent motherboards don’t make use of jumpers or DIP switches to configure their settings. Most of the configuration is done by settings in the BIOS/UEFI setup program. A jumper on the motherboard is likely to be used to reset the BIOS/UEFI to its default settings, which would need to be done if settings are set that prevent the PC from booting. The jumper is placed over two particular pins to enable a particular setting, information about which is provided in the motherboard’s user manual. The pins can be seen in the image of the block of jumpers below


The motherboard is usually fixed to a plate in the case that has stand-off (mounting) holes for stand-off screws that match the screw-in holes on the motherboard.
The copper or brass stand-off screws (also known as risers) come with the case. The image below shows a stand-off screw. Some cases supply risers that are pressed into the holes in the mounting plate inside the case instead of being screwed in.
The stand-off screws keep the motherboard insulated from the case by air, are screwed into the plate, and the motherboard is placed over them and screwed into them. Each case will have its own method of securing the plate containing the motherboard to the inside of the case so that the motherboard’s built-in ports fit through the ports panel, an image of which is shown below. A standard ports panel is provided by the case and a customised one that fits the motherboard exactly is supplied with the motherboard.
You usually have to place the washers over the holes in the motherboard and then screw the board into the stand-off screws on the plate. The plate with the motherboard fixed to it is then fitted and screwed into the case so that the ports fit into the cuttings of the ports panel, which is a removable piece in its own right that fits into its cutting at the back of the case. You may just have to clip the plate containing the motherboard into the case and then secure it to the back of the case with screws in the same way as you would secure the side panels of the case.
If the PC case has an unusual way of installing the motherboard or other devices, fitting instructions should have been supplied with the case, or you should be able to obtain the information from a user manual made available as a download from the PC case manufacture’s website.
A particular motherboard might have a different set of ports compared to the ports panel provided with a standard ATX case. A mixture of USB 2.0 and 3.0, network, audio and video ports might be provided that a standard ports panel won’t have cut-outs for. If this is the case, the motherboard manufacturer will provide the ports panel required by the motherboard. You will then just have to remove the standard panel and replace it with the non-standard panel.
The image above is of a ports panel that came with an MSI motherboard. The two circular openings on the far left are for PS/2 keyboard and mouse connections and the three openings on the far right are for the sound connections, with the LAN networking and USB ports beside them.
You shouldn’t have to drill any holes; all of the holes will be where they ought to be. – Both ATX and micro-ATX motherboards are designed to be fitted into ATX cases.
If you want to see how to install a motherboard in a case, view this video:
Build a PC Computer – How to Install a motherboard –
There is no need to use an anti-static wrist strap, just touch metal that is not insulated from the ground, such as the PC’s case with the PC switched off but connected to the mains. I have installed many motherboards, adapter cards and much memory and never had any component fail due to undischarged static electricity.
Here is a good component-installation video:
ASUS How-To – Install PC Components Inside the Case –
“Learn from JJ how to install your GPU (graphics card), PSU (power supply unit) and how to mount your motherboard inside the Corsair Carbide Series 400R Tower (case).”
Choices of processor
You will have to make a choice between an AMD or an Intel processor and then purchase a quality motherboard that supports your choice of processor and the other components. Many motherboards provide built-in graphics and sound chips and both Intel and AMD have processor models with a built-in graphics card for low-end workstations, not PCs used for graphics-intensive operations, such as playing the latest games and video-editing. Preferably choose a motherboard that is as upgradable, or, at least, as overclockable as possible. Overclocking means setting the processor to run faster than its stock default speed by increasing the system bus frequency/speed, the clock multiplier and the processor’s voltages, which are settings in the BIOS or UEFI BIOS.
Visit the Processors section of this website in the Hardware menu on each page for detailed information on them.
How to decode Intel/AMD processor names – What processor names mean
The alphanumeric model names of the ranges of processors that Intel and AMD manufacture contain important information about them. The following article provides the information you need to understand what the numbers and letters in the model number mean. –
Overclocking an AMD A-Series A8-3870K APU processor
The following excellent article on overclocking an AMD A-Series A8-3870K (first-generation Llano) APU, which can play the latest games without help from an additional graphics card, covers the overclocked components – the processor, memory and the additional Radeon HD 6670 graphics card. The beginning is a very informative interview with overclocking expert, Sami Mäkinen. The processor is tested on five platforms running the latest games.
Professional Help: Getting The Best Overclock From AMD’s A8-3870K –
http://www.tomshardware.co.uk/a8-3870k-apu-overclocking-guide,review-32499.html
The following page provides access to the specification information on all of the desktop-PC processors made available to date by AMD and Intel. The further down a particular list a processor appears, the more recent it is.
Desktop CPU Comparison Guide –
http://www.techarp.com/showarticle.aspx?artno=337&pgno=0
Cooling: How to keep the processor cool
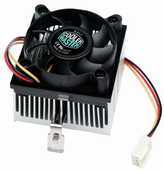
You will need a heatsink and fan unit to cool the processor. Boxed, retail processors made by Intel and AMD come with a recommended cooling unit, but you can also buy more expensive, fancier, more effective cooling units from most large retail or online computer stores or from Amazon (the web search query cpu cooling produces a wide range of items from fan to liquid coolers. The image below shows a basic standard Cooler Master heatsink and fan unit.
Note well that some of the heatsink and fan units for modern high-speed processors can have some form of sticky heat transfer material on the underside of the heatsink – usually in the form of a small square – that fits over the processor’s central core where the main processing chip is housed. This will help the heat to conduct away from the core to the heatsink so that the fan can dissipate the heat into the case. Since it is sticky, a thin protective plastic cover will have to be removed prior to fitting the cooler to the processor. Failure to do so can cause the processor to overheat rapidly enough to destroy itself.
If the heatsink and fan unit came with a strip of film covering its thermal compound, you should not remove the heatsink and fan from the processor after it has been installed and expect the compound to function properly again, because it can only be used once.
If the cooling unit doesn’t provide any heat transfer material, you can use thermal paste – or a thermal pad can be used.
Keeping Your CPU [Processor] Going If Your Cooler Fails [Sept. 2007] –
http://www.tomshardware.co.uk/cpu-cooler-fails,review-29650.html
_________________________________
Liquid cooling systems
Liquid-cooled systems have been available for some time, but it is expensive compared to using the usual heatsink and fan coolers. For most users a water-cooling system is not necessary; only the users who want the highest possible performance from an overclocked system would have need of one. Have a look at the Cooling on the Tom’s Hardware site for the latest cooling devices, many of which use water-cooling.
Here is a beginners guide on how to install a water-cooling system and some other useful articles on water-cooling systems:
A Beginner’s Guide For WaterCooling Your PC [March 2007] –
http://www.tomshardware.co.uk/a-beginners-guide-for-watercooling-your-pc-uk,review-2126.html
Corsair H70: Next-Gen Self-Contained Liquid Cooling –
http://www.tomshardware.co.uk/corsair-h70-liquid-cooling-radiator,review-32035.html
Comparing Water Coolers: We Follow Your Lead [Oct. 2007] –
http://www.tomshardware.co.uk/comparing-water-coolers,review-29667.html
Radical CPU Coolers from CoolIT –
http://www.tomshardware.co.uk/radical-cpu-coolers-from-coolit-uk,review-2338.html
_________________________________
Quality cooling units are usually fairly cheap and are easy to install, but they can also be expensive. Make sure that the unit is designed to be used with the make and model of the processor you have or intend to purchase.
The more high-end and power-consuming the components are, and the heavier the duty that the PC is put to, the more will it be necessary for an expensive cooling unit for the processor, and even, if necessary, the video/graphics card.
Remember, you can purchase additional case fans to cool the case and other high-end components that get hot, such as a hard disk drive.
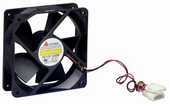
You can also purchase additional fans to fit in the case. The image below of a case fan is not of the same scale as the heatsink-and-fan unit shown above.
If you want a computer that is a quiet as possible, fans of 120mm (12cm/4.72″) are recommended because they spin slowly compared to smaller fans and therefore don’t make as much noise. If you buy a case, find out the size of its case fan(s).
I have a case which has a transparent side that has a 100mm (10cm/3.93″) fan in its middle that has a blue LED light in each of its corners that cast blue light into the case. If I want to see if the processors fan is working, I just have to look into the case. The noise the fan makes is slight. The base unit (tower case) stands on a computer desk so that the side of the case with the fan in it faces the monitor, so it blows air across the desktop, which I find refreshing, even in winter.
If there isn’t a ready-made mounting position or opening in the case, you may have to cut an opening in it to fit a case fan, depending on how many fans are already in the case, or where in the case you want it.
Just make sure that you attach the plug for the fan to the motherboard connector the right way round. You don’t want the fan to spin in reverse and suck air into the computer when the intention is to make it expel air.
You should have the fans arranged so that they create a flow of air across the components. Therefore, you can have a fan at the front of the case pulling air into the case and one at the back of the case that expels it. What you don’t want is two fans that are both drawing air into the case.
Different processor/sockets have different ways in which a cooling unit (usually a heatsink and fan unit) is attached to the installed processor.
A heatsink and fan unit usually has clips that are fastened to projecting connection points on the processor’s socket – or it fits on to a special fitting built into the motherboard – or the cooler has four feet that clip into holes in the motherboard.
The image below shows a Socket 478 motherboard (still available, but a socket that is no longer being used by Intel for its latest processors). The processor’s socket is surrounded by the fitting to which the heatsink and fan unit is fitted. It is an unusual board because it only has one PCI slot (white, bottom left-hand corner) and an AGP slot for a graphics card under it. The PCI Express standard is used for the latest graphics cards
Intel’s Socket LGA775 and subsequent processors don’t have pins
Intel’s Pentium 4 Socket LGA775 processors and later Intel processors (Socket LGA1366, LGA1156, LGA1155, etc.) don’t have pins on the underside of the unit that fit into matching holes in the socket, they have metal contact points called a land grid array (LGA). The flat contacts on the processor’s underside make contact with tiny coils on pins inside the socket. The processor sits on top of them.
The coils inside the socket are mounted on pieces of metal (pins), which give them a bit of spring so that they push up and make firm contact with the metal contact points on the processor. When you install or remove the processor, it’s possible to bend or move the pins. If one or more of the coils can’t make contact with the processor, the computer won’t start up. If that happens after you’ve installed the processor or removed and reinstalled it, examine the socket from above. The pattern of pins should be completely ordered and symmetrical.
If any of the pins are out of line, you can use a knife with a sharp point or a pin to ease them back into position, but you must make sure that you don’t cause a short circuit by leaving any of them making contact with each other.
The idea is to get the vertical part of each of these inner pins into an upright position and equidistant from the surrounding pins. It might not be possible to get them exactly equidistant from one another, but as long as their locations are approximately right, they should be able to make contact with the contact points on the processor. If you replace the processor and its heatsink/fan unit and starting up the computer fails, you’ll have to try adjusting the pins until startup takes place.
The only problems with the actual external pins still being used on processors made by AMD is that they can get bent and have to be straightened if booting does not take place. Never use force to install a processor that has external pins because if just one pin breaks off, the processor is rendered useless. That is why the Zero Insertion Force (ZIF) sockets were developed. If the correctly-aligned processor doesn’t just drop into its socket with the socket’s securing lever lifted, one or more of its pins must be out of alignment. The lever is then pushed down to secure the processor in its socket.
_________________________________
If the cooling unit is too cheap or poor quality it is likely to break down and cause overheating problems. Shutdown protection was built into all motherboards soon after the arrival of processors running at 1GHz, but unsaved data can be lost when the system suddenly shuts down.
Make sure that you purchase a cooling unit made for the type of processor you are using. As shown in the image above, an Intel Pentium4 (Socket 478) processor, requires a special cooling unit that is designed to clip over the matching structure of the processor’s socket. It cannot be used for any other type of processor. When you buy a cooling unit online and in a store, its webpage and packaging will state which processor sockets it supports. Some CPU coolers support ranges of both Intel and AMD processors.
Note that many motherboards are able to report the CPU temperature in the BIOS setup program. Some also include interface software for reporting vital statistics in Windows, thereby allowing you to actively monitor the temperature. You might also be able to set an alarm level at which the BIOS issues a warning sound. For instance, you could set the alarm or shutdown levels at 60 degrees Celsius (60°C) for the processor.
In any case, the motherboard’s manual will contain the information you need to know about any onboard temperature monitoring if it is available.
If possible, if you buy an expensive cooling unit, you should buy one that attaches to a plug from the power supply instead of one that plugs into the motherboard, because the fan might draw more power than the motherboard connection can supply and short it.
A standard ATX motherboard (ordinary size, or micro-ATX) will fit into a standard ATX case. You should know that proprietary makes of computer, such as Dell and Hewlett Packard do not use standard cases or motherboards. They use their own customised ones, which means that you cannot install a standard ATX board in their cases – you have to use their products – if they are available – usually sold at a premium over standard motherboards.
If you purchase a new, boxed motherboard, it will come with a full set of cables for the number of hard disk drives and floppy disk drives that it supports, and a user manual that provides all of the installation and configuration information, including the BIOS settings, much of which will be illustrated.
If this is not the case, visit the motherboard’s website to find out if you can download a manual. Otherwise, unless you can work out how to configure and install the motherboard, don’t purchase it.
Read the BIOS section of this website for more information on the BIOS setup program.
Read its manual all the way through before you attempt to install the motherboard. If it doesn’t make complete sense to you, ask for help from a computer forum, such as the one at Tom’ s Hardware Guide, the Windows Secrets Lounge – most Internet Service Providers, such as Plusnet in the UK, now have good computer forums – or your local computer store.
Next page: Installing the processor (CPU) and its cooling unit