Detailed PC power supplies/PSUs information
This page of the Build Your Own PC section of this website deals with the ATX12V 2.0 power supply unit, often called the PSU, used in ATX PC cases to power all of the PC’s components. Only information on PSUs likely to be useful when building a desktop PC is provided here. For general information on PSUs, visit the following page under the Hardware menu on this site:
https://www.pcbuyerbeware.co.uk/hardware/motherboards-cases-psus/power-supplies-psus/
The power supply is vital part of the desktop PC and should be given serious consideration when buying one. If you can’t discover what the make/model of the PSU is before you buy a PC from its specifications provided by the seller or manufacturer, you should ask the seller, otherwise you will have to open up the case to find out if it is a quality unit or one of poor or bad quality that you should replace. In reviews of PC cases that come with a PSU and PCs, the make/model of the power supply is seldom provided, usually not even by the case or PC manufacturer. Remember that there are cases of bad-quality PC power supplies having caused house and office fires. Information is also provided on Uninterruptible Power Supply Units (UPS) used as a backup source of power should the mains power fail.
Power supplies/Power Supply Units – PSUs
NEVER OPEN A POWER SUPPLY UNIT. ITS CAPACITORS CAN CARRY A LETHAL CHARGE LONG AFTER IT HAS BEEN SWITCHED OFF!
NOTE WELL – BEFORE TURNING A POWER SUPPLY UNIT (PSU) ON, ENSURE THAT THE VOLTAGE SELECTION SWITCH ON THE PSU IS SET CORRECTLY (230V in the UK -115V in the USA).
The new power supply standard: ATX12V 2.0
A new ATX standard for power supply units has replaced the previous ATX 1.3 standard. It’s called ATX12V 2.0.
The old ATX 1.3 standard has a 20-pin power connector that connects the power supply to the motherboard. The ATX12V 2.0 standard uses a 24-pin power connector. The image below shows the two power connectors, with the smaller 20-pin connector on the left.
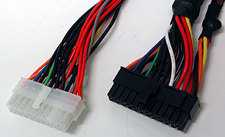
An adapter is required to be able to use the new 24-pin plug of a ATX12V 2.0 power supply in motherboards that have the current ATX 1.3 20-pin motherboard connector. Most power supply manufacturers include one with their new ATX12V 2.0 power supplies, because 20-pin connectors are still being used on many motherboards. A 20-pin power-supply cable also fits into the adapter, making it possible to use an old-style power supply unit with a motherboard that has the new 24-pin connector.
Because of specific power requirements of components, such as the processor, you should always read the motherboard’s user manual all the way through before you start buying or installing the components in the case. The power requirements for the processor and the graphics card(s) will always be made clear in it. All of the major motherboard manufacturers provide downloads of their motherboard manuals, which can be read before buying a particular make/model of motherboard.
The major motherboard manufacturers can recommend power supplies suitable for use with a particular model of motherboard on their websites on their websites.
Power supplies are often recommended or ridiculed on computer forums.
ATX is a power standard as well as a motherboard standard, as is the newer BTX (Balanced Technology Extended) standard, which was intended to replace the ATX standard for power supply units and motherboards. However, although Dell used it extensively, it has failed to take over from the ATX standard.
In June 2007, AMD announced its own DTX form factor, which is similar to Intel’s BTX form factor. However, at the time of reviewing this (January 2015), the ATX standard still rules.
Watch the following video if you want to see a demonstration of how to install an ATX power supply in a case and connect its cables to the devices to an ATX motherboard and inside the computer.
How to install a Power Supply [the power connectors for the various devices – motherboard, Molex, SATA hard drive, PCI Graphics card, etc., are shown/discussed] – http://www.youtube.com/watch?hl=en-GB&gl=GB&v=xvClS_M-09o
There are many other YouTube videos showing how to install a power supply unit be it a standard or modular model.
If want in-depth details of the specifications of a power supply, read this article:
Power Supply 101: A Reference Of Specifications [Dec. 14, 2011] –
http://www.tomshardware.co.uk/power-supply-specifications-atx-reference,review-32338-9.html
Failure to ensure this switch is set to the correct voltage can destroy your power supply unit or at the very least blow a fuse in it. – And do not use the power supply unit unless it has a load attached to the motherboard, such as the video card and hard disk drive. Turning the power on with only the motherboard attached to it, could also destroy the power supply unit, which must have a load to function without burning out.
The power supply unit (PSU), usually just called the power supply, is the component that provides the computer’s components with power. It is connected to the mains electricity by a power cable and is itself usually connected to the PC’s motherboard via a main power connector and an auxiliary power connector. If the auxiliary power connector is not connected, the PC won’t boot – a mistake that is often made by people building their first PC. When the Power button is pressed in the front to the case with a desktop PC and the power button on a laptop PC, the motherboard turns the power supply on, its internal fan starts working and power is supplied to the components connected to the motherboard.
Some of the PC’s components are only powered from the motherboard, such as an adapter card (graphics/video card, network card, sound card, etc.), and others are powered only from the power supply (hard disk and optical CD/DVD disc drives). Some high-end graphics cards installed in adapter-cards slots are powered from the motherboard and from one or two power connectors from the power supply.
Since the motherboard has to be switched on via the PC’s Power button before the power supply is turned on, if the power supply’s fan works while it is not connected to the motherboard then the power supply is faulty. If the power supply doesn’t work when the Power button is pressed, then either the power supply is not connected properly to the motherboard or the motherboard is faulty.
You can program what happens when the Power button is pressed when the PC is working via the Power Options category in the Windows Control Panel. You can set the PC to go into hibernation, standby mode (sleep) or switch off when its Power button is pressed.
The power supply is one of the most overlooked components in a PC. I suppose the reason is that most people simply believe that if a power supply unit has the physical capacity to be connected to the other components via the motherboard then it must be able to deliver the quality of power that they require.
Unfortunately, that is often not the case, because the power supply in a computer, or the power supply that comes with a PC case, can be under-powered or of low quality. If that is the case and you install a high-end graphics card or a dual-core processor, the system could become unstable or might even fail to boot.
In 2005, I bought an Advent desktop PC from PC World for office use that came with a decent power supply unit. When it gave up the ghost, I looked at the specs and bought another Advent desktop PC from PC World, but when I opened the case it had a very light 300W switching power supply made by ISO that can be purchased for $15, so I replaced it with a decent 400W model made by Corsair, because if the power supply blows it can take the other components with it. The power supply wasn’t listed in the specs provided by PC World. This is the one component that PC manufacturers can skimp on without the buyer noticing it, so you have to check what is installed yourself. Even reputable case manufactures, such as Foxconn, are using these cheap ISO power supplies in their cases.
Here is an Amazon UK purchaser review of an “Alpine Black 700W Silent Quiet PC ATX PSU” priced at £19.95, which a self-builder should avoid like the plague:
“After 3 months of having the power supply… BOOM!!! Was like my own personal firework display for a couple of minutes. I quickly removed it from computer and the mains.
“Would really not recommend this even if you like fireworks. As many others have said.
“This wasn’t even worth the £19.95 as it could have caused more damage. Luckily my computer was saved, but I would recommend going with Corsair instead.
“Hardware I had when it blew:
“AMD FX-8150 Bulldozer processor
“GTX 3GB 660TI FTW graphics card
“Corsair 8GB 1600mhz RAM memory
“Western Digital 1TB 7200rpm hard drive
“Crosshair Formula V motherboard
“700W should have been more than enough for this machine, this power supply must not be capable of what it says. With the amount of bad reviews this item should really be taken off.”
Many other purchasers found it inadequate, while others had no complaints, seven even gave it the maximum of five stars, probably because their self-built, low-power PCs were built around a motherboard and processor that provided integrated video and sound, or they were using it to replace the power supply in an old, low-spec PC.
Note that most power supplies should fit into a standard ATX case, but some of them have more depth than is usual, so make sure that you can fit a power supply in your PC case before you buy it.
In the UK, a power supply uses the 230V AC mains supply that transforms it into the DC (direct current) power at the correct voltages for the computer’s components.
Some power supplies have a switch to change between 230V (used in the UK) and 115V (used in the USA), but other models have automatic sensors that switch input voltage automatically, or are able to accept any voltage between those limits. If the power supply uses a switch, you must make sure, having just installed it, that you have it set to use the correct voltage before you switch the computer on.
Choosing a power supply for your self-built desktop PC is an important factor that can easily be underdone or overdone, depending on your computing needs. A gaming computer requires much more power than an office computer. The following power calculator allows you to enter the components. When all of the components are entered, the calculator tells you the wattage you require, which allows you to choose a power supply that provides that wattage plus some overhead just in case all of the components are being used at the same time. The power used by the motherboard is factored into the calculation. Search for Enermax Power Supply Calculator to find a good one.
Different components require different voltages, so a power supply is really several power supplies in one unit. Each supply is called a rail. All power supplies have three main rails – 3.3V, 5V, and 12V – two secondary standby rails – 12V and 5V. A power supply’s maximum wattage (e.g., 700W) is the total power it can supply across all of its rails. Some power supplies can have up to four 12V rails. These are used to power PCs running powerful components so that they can each have their own rail.
Power supply rail [Page valid Aug. 2012] – http://en.wikipedia.org/wiki/Power_supply_rail
A modular PSU comes with detached cables that are added as needed; a standard PSU comes with all of its cables attached to the unit. A standard ATX12V 2.0 power supply has several four-pin Molex and SATA connectors/plugs. Molex plugs are connected to IDE ATA CD/DVD optical drives and IDE ATA hard disk drives and some redundant-technology AGP graphics cards. SATA connectors/plugs connect to SATA hard disk drives and optical SATA CD/DVD drives. Molex-to-SATA adapters that make a Molex plug into an SATA plug are readily available, but SATA-to-Molex adapters are not.
Note that adapter cables are available that bridge the previous and current power supply standards. The following webpage shows which adapters are available:
PSU Power Cable Adapters [Page valid Jan. 2015] –
http://www.akasa.com.tw/update.php?tpl=product/…
Note that the motherboards for Intel Pentium 4 and AMD Athlon 64 and the current AMD and Intel processors have what is called an additional ATX 12V Power Connector. It is a small square box on the motherboard for a four-pin or eight-pin plug from an ATX12V 2.0 power supply unit.
Most motherboards with this connector won’t boot unless it is connected. You should not use a standard ATX 1.3 power supply unit, because it doesn’t not provide such a connector.
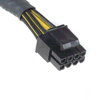
Some motherboards that run require the use of 1x12V (8pin) power connector to supply additional power to the processor, which not all power supplies provide. However, not all motherboards require an 8-pin power connector. The MSI 945GCM-F motherboard that can run Intel Core 2 Duo processors only uses the additional 1x12V (4pin) power connector shown in the image below.

You have to have a power supply that provides the 8-pin connector to use it with such a motherboard or you have to buy an adapter. An ATX 4 Pin Male to 8 Pin Female EPS Power Adapter Cable, available from Amazon for £2.50, is attached to the 4-pin auxiliary power connected to convert it to an 8-pin connector. It is also possible to use a 4-pin Molex to 8-pin 12V EPS Motherboard ATX Power Cable Adapter (£3.99 in Jan. 2015) to convert a standard Molex power cable used to power non-SATA devices (IDE hard drives, etc.).
Note that some power supplies provide an 8-pin connector that can be split into a two 4-pin connectors, as shown in the image below, allowing it to be used with motherboards that require a 4-pin or an 8-pin connector.
Powerful high-end PCI Express graphics cards connect to a six-pin or eight-pin power connector from the power supply, so if you buy such a card your PC’s power supply must have one. The most powerful PCI Express graphics cards require two such connectors, which are also required for dual-graphics-card setups the cards of which require one each. There are four-pin, six-pin and eight-pin power connectors and there are: “PCIe2.0 cable adapter, updates PSU compatibility with latest VGA cards. Converts 6pin PCIe to 8pin PCIe2.0” and “PCIe cable adapter, updates PSU compatibility with PCIe VGA cards. Converts 2x 4pin Molex to 6pin PCIe.”
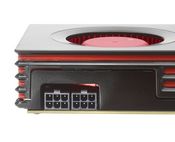
Some PCI Express graphics/video cards require to be connected to the power supply unit (PSU) via a special PCI Express power connector. If you use two such cards, you need a power supply unit (PSU) with two such power connectors – one for each card. An excellent example is the Akasa Power80+ 500W unit. (Akasa also make excellent cases). It has “Two CPU 12V connectors” that combine to make an 8-pin connector (required by some motherboards) or spit in two to make a 4-pin connector (required by some motherboards) and “PCI-E connectors for multiple dual GPU”, which translates as PCI Express connectors for multiple graphics cards. The image below shows two 6-pin power connectors on an AMD Radeon graphics card.
Note that the latest AMD and Nvidia graphics cards use a six-pin and an eight-pin PCI Express connector. Tom’s Hardware provides in-depth reviews of power supplies that include the power cables that are provided with each model.
http://www.tomshardware.co.uk/t/power-supplies/
NVIDIA SLI and AMD CrossFire dual-graphics-card technologies
Note that er Nvidia’s SLI technology or AMD’s CrossFire technology that makes it possible to use two graphics cards are both now outdated technologies. In any case, both of them turned out to be too problematic to be bothered with. It is now possible and much better in all scenarios to use a single graphics card.
If you plan on using dual graphics cards that use either Nvidia’s SLI technology or AMD’s CrossFire technology, make sure that your PC has a power supply that explicitly states in its specifications that it supports the dual-card technology that you want to install. A power supply can have certification for both technologies or only one of them.
Next page: Installation of motherboard, processor (CPU) and RAM memory