The PC case is a neglected component
Below is a link to a good video on the building of a desktop PC that uses the small ITX form factor case and motherboard. There are plenty of good tips.
The computer’s case, like the motherboard, is a neglected component. It’s possible to buy a case without a power supply unit (PSU), which powers the computer, but many cases, especially the cheap ones, come with one, therefore care should be taken when making a choice.
The PC case with its power supply unit (PSU) are crucial components whose importance is often overlooked. This is a serious oversight, because the case (with its power supply) is as important to a PC’s stability and performance as its RAM memory, motherboard and processor. The case should be well designed so that it is quiet (has no whining internal fans) and keeps the internal hardware adequately cooled. The case should also provide easy access to its components so that it is easy to work on.
They also come in several different sizes and types – mini-tower, midi-tower, full tower, and desktop (a desktop case lies horizontally on the desk instead of vertically like a tower case). Since most users don’t require anything more than a midi-tower case, it is the type most commonly used in the construction of a personal computer.
AT cases and motherboards have been superseded by the ATX standard, which, was expected to be superseded by the BTX standard that Dell already uses for all of its Intel-based desktop PCs. However, that succession has not happened and the ATX form factor is still king.
The description of a motherboard that indicates its type is called its form factor. ATX form-factor motherboards fit inside ATX cases.
Home Theater PC (HTPC) cases, which usually lie horizontally as opposed to vertically, can usually accommodate standard ATX components, so it isn’t necessary to buy specially-sized motherboards or half-height adapter (video, sound, etc.) cards.
Most of the current PC cases have some tool-free features, such as clips that retain adapter cards, thumbscrews for the side panels, and tool-free drive bays that have plastic rails that clip to the side of the hard disk drive(s) and CD/DVD drive(s).
If you read the new desktop PC reviews in a computer magazine, such as Computer Shopper (Expert Reviews on the web), the name of the case is seldom mentioned in the articles, and is never given a reference in the comparative tables at the end of the articles. A serious oversight, because if you have a bad case with an unreliable, poor, or low-powered power supply, you have a bad system that is highly likely to be very problematic no matter how good the other components may be.
On a high-quality motherboard, there are several large capacitors that store power that is distributed to the RAM and processor as the power requirements fluctuate. But there are not as many large capacitors on economy motherboards that cost under £50/$100, so the quality of the motherboard and the power supply must be taken into account when making a decision on which make and model of both components are to be purchased.
As a crucial part of a self-built computer, you will therefore need to purchase a quality case, part of which will be a quality power supply unit (PSU) or you will have to buy one.
When buying a power supply, all you have to do is to find out if it can run the type of processor and graphics card you are going to use it with and that it is a quality unit that it is relatively small compared to the inside of a midi-tower case of the kind shown below, and that it is heavy.
Quality power supplies are heavy; cheap units are comparatively light. For example, a quality 400W power supply should weigh about 1.8kg or 4lbs. The reason for the weight: the capacitors and components that deliver a quality supply of power are heavy. If a power supply designated as a 400W unit only weighs about a pound or half a kilogram, it doesn’t contain high quality components and is likely to cause problems, especially when the computer is stressed and needs to draw plenty of power, or the mains supply becomes irregular. Read the following article called, “How to pick the best PC power supply”:
http://www.pcworld.com/article/2025425/how-to-pick-the-best-pc-power-supply.html
****
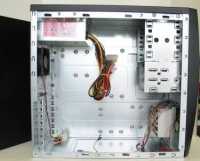
The image below shows the inside of an inexpensive case without any of the components installed. One of the side panels has been removed. The small power supply unit, with the various power cables coming from it, can clearly be seen in the upper left hand corner. A modular power supply allows the attachment of the cables as you need them instead of having them all attached to the unit. The case fan with its cable is just below the PSU.
Note that there are many different designs of case that can have all kinds of fancy ways of opening them and installing or removing the components. The case shown below is a standard case in which all of the components are screwed into it.
Inexpensive cases that don’t require any tools to install or remove the components are available, such as the Raijintek AGOS Mid-Tower Chassis ATX case, which is priced at only £40 (January 2015). It does not come with a power supply.
Raijintek AGOS Mid-Tower Chassis – https://www.youtube.com/watch?v=2SCWszNgzeM
The drive bays are in the upper left-hand corner of the case and below them are the plugged cables that come from the front of the case for the case speaker that delivers coded beep sounds from the BIOS, the LED lights, the Reset switch, and the Power-on switch, as shown in the image below. As you can see, the plugs that fit into appropriate connection points on the motherboard are usually clearly labelled. Exactly where they are connected will be illustrated in the motherboard’s user manual, dealt with under the section of this article that deals with the motherboard, processor and RAM, to which a link is provided in the page index on the first page.

Front-mounted ports
Most current PC cases provide USB (USB 2.0 and USB 3.0) and audio ports from the front of the case that are usually concealed behind a panel. An eSata port (for an external SATA hard disk drive or CD/DVD writer) and FireWire ports provided at the front of the case were more common at one time but are now rarely provided. USB 3.0 support is now provided by most motherboards, on the main ports panel that appears at the back of the case when the motherboard is installed and from USB 3.0 headers on the motherboard that connect by cables to USB ports in the front of the case.
In order to be used, the motherboard must provide the headers that their cables connect to, but the case should but might not provide the cables. It is unlikely that the cables will be provided with the motherboard. So, if you want USB ports from the front of the case, make sure that any case you buy supplies the cables. The motherboard’s user manual, which is can be downloaded from its manufacturer’s site, should provide you with the information on where the headers are located on the motherboard.
If the headers are provided by the motherboard for the front-mounted ports and one or more of them don’t work after being connected to a port, check the motherboard manual for a jumper setting that enables them.
Next page: If the power suppy unit fails dramatically