Installing SATA hard disk drives, SSD and CD/DVD/Blu-ray drives
Update: The latest M.2 NVMe SSD card drives
UPDATE – JULY 2020. – Fast SATA SSDs in card form that connect to special M.2 slots on motherboards have been available for several years. However, recently much faster M.2 NVMe SSDs, also in card form have become available. They also connect to M.2 slots in the motherboards that support PCIe NVMe cards. They are at least three times faster than SATA SSD card drives and provide five times the bandwidth.
Note that an SSD drive or M.2 SATA or NVMe card have a limited number of write cycles. When the write cycles are exhausted, after many years of use, the drive merely becomes read-only. It does not become unusable. You can clone the drive to a new SSD because all of its data can still be read. . When a hard disk drive comes to its end, it usually crashes and dies with the loss of all of its data. The data would in all likelihood only be recoverable by using a very expensive data-recovery company’s services.
NVMe SSDs run on the PCIe 3.0 and 4.0 bus that is very much faster than the SATA bus, which, for that reason alone, is not going to be developed much further. Which, of course, means that NVMe SSDs have become the current most desired storage drives. Most especially for gamers, who always want the fastest systems that they can afford. Ever more the case now that you can buy a 250GB NVMe drive for £50 to £60 and pay not much more for a 500GB or 1TB drive. For example, in July 2020, Western Digital NVMe Blue SSDs (250GB £46 and 500GB £57) come with a 5-year warranty.
M.2 SSD drives – Compatibility, overheating, encryption problems –
M.2 SSD drives – Compatibility, overheating, encryption problems
PCIe 3.0 or 4.0 motherboard support
Note well that an M.2 NVMe SSD runs on the PCI Express (PCIe) bus that graphics cards run on. – PCIe 4.0 is available.Its user manual tells you which version of PCIe a particular motherboard supports. In other words, if you buy a PCIe 4.0 NVMe SSD drive, it requires a motherboard with an M.2 slot that supports PCIe 4.0 if it is to run at the PCIe 4.0 speeds.
PCIe 3.0 and PCIe 4.0 backwards compatibility
“PCIe is also backward compatible. If you have a PCIe 4.0 graphics card [or an NVMe SSD] you can use it with a motherboard designed for PCIe 3.0; however, the card’s available bandwidth would be limited to the capabilities of PCIe 3.0. Conversely, a PCIe 3.0 card can fit in a PCIe 4.0 slot, but again it would be limited by PCIe 3.0.”
PCIe 4.0: What’s New and Why It Matters –
https://www.howtogeek.com/424453/pcie-4.0-whats-new-and-why-it-matters/

What this Build Your Own PC page deals with…
This page of the Build Your Own PC section of this website deals with the installation of SATA (current technology) hard disk drives, solid-state SSD drives, CD/DVD/Blu-ray optical disc drives/writers (all of which used SATA technology) and memory card readers. There is far more relevant self-build information provided here than just installation instructions, because with older and current technology components available, you can easily buy incompatible components.
For example, you won’t be able to use the full capacity of a hard disk drive which has a capacity exceeding 2.19TB (just over 2000GB) unless you have a motherboard which has the new UEFI BIOS. IDE PATA hard disk and optical CD/DVD disc drives are still being used and being sold, but I am not covering their installation here. There is plenty of information on the web on how to install them using their master/slave or Cable Select methods of installation.
Installing SATA hard disk and SSD drives
A modern computer capable of basic functions such as running office applications and email programs, accessing the web and playing DVD movies cannot function without at least one hard disk drive (HDD) or Solid-state drive (SSD drive) containing copies of the operating system and the programs and applications that it runs. Long gone are the days when home computers stored everything they needed on floppy disks or tapes. The current hard-disk, CD/DVD/Blu-ray and SSD drive electronics standard is called Serial ATA or SATA.
SATA – http://en.wikipedia.org/wiki/Serial_ATA
Solid-state drives (SSD drives), having reached large-enough capacities without costing the earth, are now a viable alternative to hard disk drives. They use flash memory similar to that used in USB flash drives (memory sticks) to store the data instead of the magnetic platters accessed by moving mechanical heads that hard disk drives use. SSD drives are currently used mainly in ultra-portable laptop PCs because they use less power.
As the price of flash memory falls and the capacities of SSD drives increase, they will probably replace hard disk drives in both desktop and laptop PCs. However, for PCs that require plenty of disk space, such as 1TB or 2TB (1 terabyte is 1024 gigabytes (GB) for software developers and 1000GB for drive manufacturers), standard SATA hard disk drives will probably be the only choice for several years ahead. That said, hybrid drives that are part SSD drive and part hard disk drive are available. They can be used to increase boot speeds by loading Windows (or an alternative operating system) from the SSD drive and storing data files and the paging swap file that Windows uses as virtual memory on the hard disk drive.
SSD drives are available that use all of the interfaces used by hard disk drives from a motherboard (PATA IDE, SATA, SCSI, SAS) or from a PCI or PCI Express adapter card, so installing an SSD drive with a particular interface will be the same as installing a hard disk drive with that interface. Most new SSD drives connected to a motherboard use the SATA interface. However, SSD drives should be configured to run optimally due to the fact that their flash memory cells can only be written to a limited number of times and you don’t want Windows or any other operating system to use the same cells all the time for routine operations, because regularly used cells will die before ones not used so regularly. One of the optimisations is to disable the virtual memory setting for an SSD drive.
The installation of a 2.5-inch SSD drive (which all use the same SATA interface as a hard drive) in a desktop PC is easy if a caddy comes with the drive, allowing it to be installed in a 3.5-inch drive bay designed for 3.5-inch hard drives. The installation is almost the same as installing an SATA hard disk drive. The drive is fixed into its caddy or fixed to two brackets that can come with a PC case, which are screwed to the drive. The drive is then installed in a suitable drive bay and the SSD is attached to the motherboard – by an SATA data cable – and power supply unit by a power cable from the power supply unit. Some SSD drives come with a 3.5-inch caddy (also know as a drive cage or enclosure) and some provide cloning software and external enclosures that are used to transfer the data on a hard disk drive to an SSD drive. If an SSD drive doesn’t come with any of those accessories, you’ll have to find your own alternatives, so, if you don’t want to search for them, make sure that they come with the drive. Free cloning software is available, often from the drive manufacturer’s website and elsewhere on the web. Here is a video showing how simple the installation of an SSD is using brackets:
Installing a SSD in a Desktop PC –
Some laptop PCs come with a spare drive bay that allows the installation of an extra hard disk drive or SSD drive, but the installation can prove to be very problematic, as illustrated by Fred Langa in the following article.
Best SSDs For The Money –
http://www.tomshardware.co.uk/ssd-recommendation-benchmark,review-32904.html
_________________________________
How to set up an SSD drive in Windows 7 optimally to increase its limited lifespan
Overuse of certain areas of a solid-state drive (SSD) will wear it out more quickly than is necessary because the storage cells have a high but limited number of times that they can be written to. Therefore, the operating system has to know how best to use an SSD drive to minimise wear and prolong the life of the drive. Windows 7 provides the required support and is currently the best operating system to use with an SSD drive.
Read the article on this website called: How to set up an SSD drive in Windows 7 optimally to increase its limited lifespan, which explains how to do that.
_________________________________
SCSI and SAS hard disk drives
SCSI and SAS (Serial SCSI) drives are not used in home desktop and laptop computers and so are not dealt with here. There are important differences between the old SCSI standard and the new SAS standard, which are dealt with in this article:
http://en.wikipedia.org/wiki/Serial_attached_SCSI
_________________________________
IDE PATA hard disk and optical CD/DVD drives
The IDE PATA standard that preceded the current SATA standard for hard-disk, SSD and CD/DVD/Bluray drives, is not dealt with here because not may people are going to be using them to build a PC. That said, there are still probably millions of PC still using them. If you want to know how to install them there is plenty of information on the web and YouTube videos. Below is an image of an IDE PATA hard drive installed in an ATX PC case. The IDE standard uses wide ribbon cables, each of which can accommodate two drives – a master and a slave drive. Single-drive ribbon cables are available as well as round ones.
Below is an image of a pair of round IDE drive cables. The slave drive is installed in the connector in the middle of the cable; the master drive is connected at one end with the other (black) end attached to an IDE connector on the motherboard.

_________________________________
How to install a SATA (Serial ATA) hard disk drive and SSD (SATA) drive
Installing an SATA hard drive is the simplest of all of the installations that requires no configuration of the drive itself unless, for example, you have to change a jumper on the drive to enable SATA 300 mode for an SATA 3.0 Gbit/s (SATA 300) drive. At the time of writing, the latest version was 3.2, The following Wikipedia page provides up-to-date information on the SATA standard.
http://en.wikipedia.org/wiki/Serial_ATA
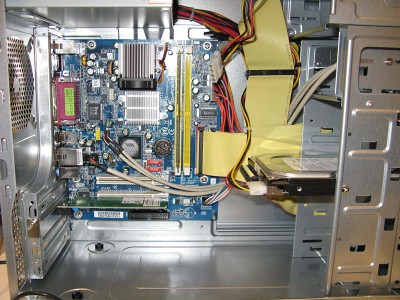
Unless a PCI adapter card is used as the interface, installation just involves connecting the drive to the motherboard with a single SATA cable (that cannot accommodate another drive), and connecting a power cable from the power supply unit to the drive’s power connector.
SATA is the interface used by solid-state drives (SSDs). Installing an SSD drive is almost as simple as installing an SATA hard disk drive except that the standard format is a width of 2.5 inches (the same as a laptop hard-drive), so the drive won’t fit in a 3.5 inch bay in an ATX case without an adapter. Most SSD drives come with an adapter kit that make this easy, but, if not, you wll have to buy an adapter. Also usually provided is cloning software and an external enclosure that is used to transfer data from an existing hard drive to the SSD drive.
Note that if your PC has an elderly motherboard that only supports the original SATA 1.5 Gbit/s (SATA 150) hard-drive standard, an SATA 3.0 Gbit/s (SATA 300) hard drive, which has a theoretical data transfer speed of 300MB/s, will work at the slower SATA 150 150MB/s data transfer speed. However, to do so, some SATA 300 drives require a jumper on the back of the drive to be set.
The jumper, which will be stored on inactive pins at the back of the drive, will have to be placed across two pins that will be indicated by a diagram on the drive. Setting the jumper makes it possible for the drive to operate at the slower speed. You can consult your PC’s or its motherboard’s user manual to find out if it supports SATA 150 or SATA 300. If your PC only supports SATA 150 and you have an SATA 300 drive, look for a diagram on the drive that shows you how to set its SATA jumper. Drives differ in their approach from manufacturer to manufacturer. The following is an extract from the manual of an MSI K9A2 Platinum (AMD Socket AM2+) motherboard showing the jumper setting to enable SATA II (SATA 300) mode on a Western Digital hard drive.
Instructions in an MSI K9A2 Platinum motherboard on how to enable SATA II mode on a Western Digital hard drive. Click on the image to see its full size
Some hard-disk-drive manufacturers, such as Western Digital, use a proprietary SATA cable that locks to the drive. Western Digital calls its SATA cable SecureConnect. The end of the cable that connects to the drive has a special secure connector. Read this guide to see a drawing of the cable.
Western Digital Serial Hard Drive Installation Guide –
http://www.wdc.com/en/library/sata/2779-001006.pdf
The download is in the form of a PDF file, which requires a free PDF reader, such as the Foxit Reader. Here is a useful extract from it:
Question: Why does Windows recognize the drive as “SCSI” when it is Serial ATA?
Answer: Most third party controller cards and RAID adapters are recognized as a SCSI device under Device Manager. This is normal and will not affect your drive or system performance.
Question: How do I verify if my Serial ATA drive is recognized by my system?
Answer: Right-click on the My Computer icon (in Windows XP), select Properties, left-click on the Hardware tab, and click on Device Manager in the window. Double-click on Disk Drives. Your new Western Digital Serial ATA drive should be listed as a “SCSI Disk Device” or “Serial ATA Disk Device.” If not, make sure that all cables are securely attached and that your system BIOS has been properly configured.
In Windows Vista and Windows 7 and Windows 8.1, the Device Manager can be opened from within the Control Panel as well as several other ways, such as entering devmgmt.msc in the Search box (the Run box in Windows XP). The devmgmt.msc command works in all versions of Windows since XP.
That Western Digital guide provides information on how to get the BIOS to recognise an SATA hard drive, and information on how to diagnose problems, partition and format the drive, and how to transfer data from an old drive to the new SATA drive.
If you want to see an SATA hard drive installed, watch this video:
How to Install Internal Hard Drives : How to Connect Serial ATA Hard Drives –
Note that the best and quickest way to ensure that you can recover your PC’s system is to create a system backup that allows you to restore individual files and folders plus a system image that can only restore the entire system and save it to an external hard disk drive on a regular basis. The external hard drive should not be connected to the computer so that if the computer goes down due to, say, a lightning strike, the backups won’t be destroyed. Windows 7’s Backup and Restore (also provided by Winows 8.0/8.1) makes a system backup and a system image by default. You create a Repair Disc by entering that name in the Start => Search… box and clicking on the link that is provided. The disc is then used to boot the computer. It provides several repair options, including restoring a system image that returns the system to exactly the same state it was in when the image was created.
Click here! to go to the information on creating backups on this website.
External SATA (eSATA) technology
eSATA (External SATA) is the external implementation of the SATA standard for external hard-disk and SSD drives. The following webpage provides good information on eSATA. –
http://www.wisegeek.org/what-is-esata.htm
Serial ATA (SATA) hard disk drives
The connection limitations of IDE ATA (parallel ATA/PATA), with its system of master and slave drives, is not longer applied to serial ATA (SATA) drives.
Serial ATA uses a single cable per drive.
You cannot attach more than one drive to a cable. While it is no longer necessary to configure the drive using jumpers, there may be a jumper setting that can reduce the capacity of the drive for motherboards that only support a certain size of drive.
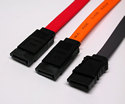
The image below shows cables used to connect an SATA hard disk drive to the motherboard. Note that none of these cables has a latch connector that clips it to the motherboard connector. See further down this page for images of an Akasa SATA cable that has a latch connector. You should use the cables with a latch connector in preference to the push-on variety of cable, because continuous vibrations can work the push-on variety loose, causing problems that are very difficult to diagnose if the cable connections are not checked first.
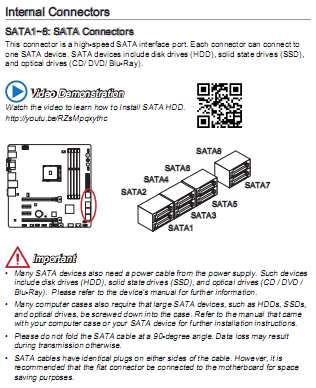
The installation is simplicity itself – just attach the keyed serial cable to the drive and the motherboard, and attach a power connector from the computer’s power-supply unit to the drive. The cable is keyed so that one end can only connect to the motherboard and the other end to the drive, so it can’t be install the wrong way round. The image below shows the connection points on a motherboard for four SATA hard drives.
Note that there are no outer walls on these connectors that keep cables (made by the motherboard manufacturer) with a locking clip connected to the motherboard. Standard push-on cables will be supplied with the motherboard. However, you can buy SATA cables with a clipping mechanism that can be connected to the motherboard connectors shown above.
The cables for SATA drives are usually quite stiff and the standard connectors don’t have any locking facility, so they can become loose and cause intermittent connection problems, such as having Windows XP/Vista failing to recognise a drive. The cables for SATA drives are usually quite stiff and the standard connectors don’t have any locking facility, so they can become loose and cause intermittent connection problems, such as having Windows failing to recognise a drive.
Some hard drive manufacturers, such as Western Digital, use a proprietary SATA cable that locks to the drive. Western Digital calls its SATA cable SecureConnect. The end of the cable that connects to the drive has a special secure connector.
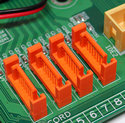
Many motherboard manufacturers, such as Gigabyte, provide a locking mechanism on the motherboard connector that a locking clip on the cable fits over. All motherboard manufacturers provide SATA cables for their motherboards. Akasa SATA cables have a locking clip. The image on the left show the cable and the image on the right shows a close-up of the locking mechanism on the cable. This kind of cable can connect to an SATA connector on the motherboard of the type in the image shown above. It just pegs the cable to the connector.

Serial ATA (SATA) power supply units
The new ATX12V 2.0 power supply units have SATA power cables coming directly from them unless it is a modular model of PSU to which cables are added as required. These power supply units have new Serial ATA power-line connectors for both hard-disk and optical (CD/DVD) drives.
Most new SATA drives don’t provide a standard four-pin Molex power connector, only an SATA power connector. However, a conversion cable will always be available so that an old-style ATX 1.3 power supply can be used with a new Serial ATA hard drive. If a power supply unit doesn’t have an SATA power connector, a converter cable can be purchased for about £1.20 from a vendor such as amazon.co.uk.
Power connectors for SATA hard disk drives are available on all new ATX12V 2.0 power supply units, so no adapter cable is needed to power them. Cables are added to a modular PSU as required. However, you have to use an adapter if you have an old ATX 1.3 power supply, which does not have an SATA power connector, or the SATA hard drive itself does not have a standard four-pin ATX 1.3 power connector. See the image of two SATA adapter cables below. The white four-pin Molex (LP4) connector fits into a power-cable connector from the standard ATX power supply unit and the black plug fits into the SATA hard disk drive (or the optical SATA CD/DVD drives that are also available). Note that some recent ATX12V 2.0 power supply units may not provide you with sufficient SATA power connectors for your SATA drives, but may provide some Molex connectors, so before you buy a power supply make sure that it provides the number of SATA power connectors that you require or you will have to buy an adapter cable.
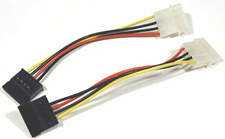
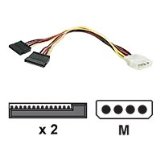
You can also buy a splitter SATA cable that provides two SATA power connectors, as shown in the image below, which shows the Molex plug (M) and the SATA plug (x 2).
Most new SATA drives don’t provide a standard Molex power connector, only an SATA power connector. However, a conversion cable will always be available so that an old-style ATX 1.3 power supply unit can be used with an SATA hard drive. If a power supply unit doesn’t have an SATA power connector, a converter cable can be purchased for about £1.20 from a vendor such as amazon.co.uk/ (amazon.com in the USA).
Note that if your PC has an elderly motherboard that only supports the original SATA 1.5 Gbit/s (SATA 150) standard, a SATA 3.0 Gbit/s (SATA 300) drive, which has a theoretical data transfer speed of 300MB/s, will work at the slower SATA 150MB/s data transfer speed. However, to do so, some SATA 300 drives require a jumper on the back of the drive to be set. The jumper, which will be stored on inactive pins at the back of the drive, will have to be placed across two pins that will be indicated by a diagram on the drive. Setting the jumper makes it possible for the drive to operate at the slower speed. You can consult your PC’s or its motherboard’s user manual to find out if it supports SATA 150 or SATA 300. If your PC only supports SATA 150 and you have an SATA 300 drive, look for a diagram on the drive that shows you how to set its SATA jumper.
Note that an old-style ATX 1.3 power supply does not provide a +3.3V connection via a Molex cable, but some new SATA hard disk drives require this voltage. If so, only one of the new ATX12V 2.0 power supply units can provide it. If you have such a drive and an old-style power supply, you will have to buy a new-style power supply. You can download the user manual for any make and model of hard drive from its manufacturer’s site. It will provide you with the power requirements of a particular model. ATX12V 2.0 is the new power supply standard that has replaced the ATX 1.3 standard. The 3.3V SATA connector, shown in the image below, is available in straight and angled versions, and comes directly from the ATX12V 2.0 power supply unit so that a conversion cable of the kind shown above is not used.
SATA data cables
SATA 1.5 Gbit/s (SATA 150), SATA 3.0 Gbit/s (SATA 300), and SAS all use the same data cables, so if you see a data cable labelled as a SATA II 300 cable, you can use it with an SATA 150 drive and vice versa. An SATA 300 cable might have a redesigned plug on the end to prevent it from coming off the drive. If you already have the SATA 150 cable, and want to reuse it for a SATA 300 drive, it will work.
Remember that the difference between SATA 150 and SATA 300 is the speed of the serial interface, not the speed of the drive. The latest SATA 300 hard drives are barely reaching the limits of the IDE ATA 100 standard, and can’t come close to filling the bandwidth available for SATA 150/SATA 300. Therefore, it’s a waste of money buying a SATA 300 hard drive, because a similar model SATA 150 drive should be just as fast.
SATA II (for SATA 3.0 Gbit/s) is a marketing ploy. In fact, the SATA-IO board says that there are no SATA II devices and that the term SATA 300 should never be used to describe a product. It would be a similar situation to building a road where the posted speed limit is 700 MPH, but the existing cars can’t go over 275 MPH. Who cares if the SATA 300 bandwidth is 3.0Gbps if the drives can’t even use the full IDE ATA 100 bandwidth?
Serial ATA – http://en.wikipedia.org/wiki/Serial_ATA
Data rate units – http://en.wikipedia.org/wiki/Data_rate_units
Serial ATA – a site devoted to the new standard – http://www.serialata.org/
If you need any SATA cables, such as a cable that converts a standard Molex power cable on a PC’s power supply to an SATA power connector, use the search term sata cables.
Remember that all of the major hard-drive manufacturer’s provide user manuals for their drives from their websites that contain illustrated installation information.
Motherboard RAID support for two or more hard disk drives
If the PC you are building has a motherboard that has a RAID controller, it allows two or more hard disk drives to be configured in a number of RAID arrays, which can use the drives together in a number of ways, such as mirroring the contents of the boot drive to a secondary drive and running several drives as if they were just one drive.
RAID – http://en.wikipedia.org/wiki/RAID
Next page: Installing CD/DVD/Blu-ray optical drives