Resize C: drive into unallocated space with an E: or F: drive between the C: drive and the free space
Problem: Resize C: drive
The partitioning of space on my PC’s hard disk drive is as follows: Recovery Partition 18.5GB that contains the system recovery data – Acer [C:] 170GB NTFS – Data [F:] 21GB NTFS – unallocated space 88GB. I want to expand the C: drive so that it absorbs all of the unallocated space, but when I right-click on the drive in Disk Management in Windows 7, the Extend and Delete Volume options are greyed out (not available). There is also no Convert to Dynamic Disk option. I only have the option to shrink the C: drive.
Answer
The number of possible scenarios can make hard disk drive resizing a complicated subject. If you have a hard disk drive with two partitions – a C: system drive containing Windows that needs space and a D: drive used for data storage that has plenty of free space, resizing C: by shrinking D: and making C: claim its space is a relatively straightforward matter using either of the free tools mentioned in this answer.
Here is how to deal with your particular situation
The Windows system volume (usually the C: drive or partition) can only be extended into free space that is directly adjacent to it on the disk. You have plenty of unallocated space on the drive, but it is separated from the C: drive by your F: Data drive.
Free third-party tools that can resize C:
Fortunately, the positions of the unallocated space and the F: drive can be moved, but doing so requires a free third-party tool such as EaseUS Partition Master from http://www.partition-tool.com/ or GParted from http://gparted.sourceforge.net. Note that the trial version of the paid-for tool cannot complete the reallocation of free space as shown in the video linked to below. You must use the free version from partition-tool.com. There are several other tools that can be used.
Using the free EaseUS Partition Master Home Edition to resize C: drive
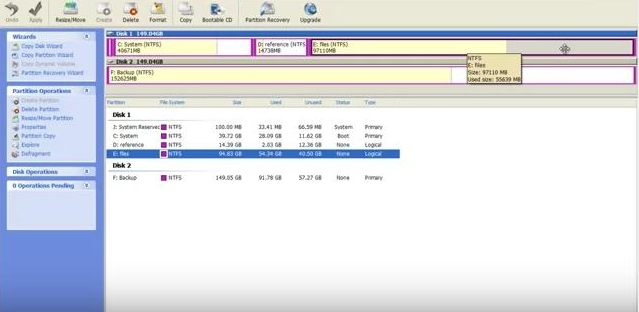
The following video shows how to do what you want to do with the free EaseUS Partition Master Home Edition just by dragging with the mouse on a graphical representation of the partitions on the drive. It shows C:, D: and E: partitions.
The first operation is to drag the free space on the E: drive from the right end to the left, shrinking it, but I just did the same operation using the latest version of the software and I had to drag the left-hand side of the E: drive to the right to shrink it. Try the alternative choice if the first choice fails to work.
In your case, it looks as if you will have to drag the right end of the F: partition over the unallocated space, because you can’t do anything to unallocated (unformatted) space. The time it takes depends on how much data has to be shifted, but the process is relatively quick.
After you have got the graphical representation of the partitions the way that you want them, you have to click the Apply button at the top of the screen. The software then does the reallocation of space from within Windows, showing graphically how the progress is going, allowing you to work with the computer as it does so.
Precautions to take – create a restore point and create a backup/system image
Note that just in case anything goes wrong when making changes like this, always create a restore point in System Restore and make a backup or system image using Backup and Restore in Windows 7 (in Start => Control Panel) or a third-party backup tool.
Free software to extend system partition –
Here is the information provided by EaseUS Partition Master’s user manual:
http://www.partition-tool.com/easeus-partition-manager/manual.htm
Using GParted to resize C: drive
Alternatively, download the ISO file of most recent non-beta (non-test) release of the free GParted and burn the file to a recordable CD/DVD, which automatically creates a disc that will boot the system when the disc is in the optical drive and the PC’s BIOS or UEFI setup program is set to make that drive the first boot device. The CD/DVD drive can be left as the first boot device because if there is no disc in the drive the second boot device – the hard disk or SSD drive – boots the system.
The disc-burning can be done in Windows 7 by right-clicking the file, clicking Open with…, choosing Windows Disk Image Burner and following the prompts. After the disc is burned, restart the computer, which, if the CD/DVD drive is enabled as the first boot device in the BIOS/UEFI, will boot from the CD/DVD instead of into Windows. The excellent burning software from https://cdburnerxp.se/ has an option to burn an ISO file that can be used in Windows XP and Vista. Visit the BIOS section of this website for information in how to set the first boot device.
With GParted running, the disk’s two volumes and free space should be shown in the same way as in Windows Disk Management console, shown in the image below, which can be brought up by entering diskmgmt.msc in the Run box in Windows XP and the Search… box in Vista/Win7/Win10.
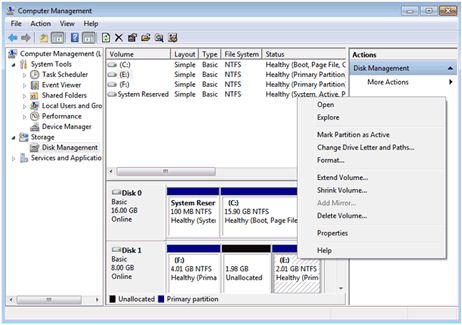
The F: drive has to be moved to the end of the disk so that the unallocated space is next to the C: drive. Click on the F: drive to select it, checking in the Label column that you’ve selected the partition called ‘Data’, then right-click on it and click on the Resize/Move option. In the Resize/Move window, click on the graphical representation of the F: drive and make it slide to the right side, before clicking the Resize/Move button.
GParted should now show a preview of the C: and the F: drives separated by the block of unallocated space. If so, click the Edit menu and select Apply All Operations. The F: drive and all of its data will be moved to where you want it, which will take some time to complete, depending on the amount of data that has to be shifted. The F: drive is only 21GB, so it shouldn’t take longer than about half an hour or less.
Using Windows Disk Management to finish the job
Next, exit, choosing to restart, and return to the Windows Disk Management console by entering diskmgmt.msc in the appropriate box. You should be able to right-click on the C: drive’s graphical representation, select Extend Volume and expand the volume to fill all of the free space. There is no need to convert to a dynamic disk unless doing so becomes necessary. E.g., to set up a RAID array of hard drives working together in one of a number of possible configurations.
Microsoft: “Dynamic disks provide features that basic disks do not, such as the ability to create volumes that span multiple disks (spanned and striped volumes) and the ability to create fault-tolerant volumes (mirrored and RAID-5 volumes).”
Because the conversion to a dynamic disk applies to the whole drive rather than a partition on it, the option to do so is accessed by right-clicking on the first block in Disk Management, probably described as Disk 0, and then clicking on Convert to Dynamic Disk in the menu that is presented.
Related posts on hard disk and SSD drives on this website
1. – Using my PC is difficult – Hard drive hogged for 15 to 20 minutes at startup
2. – Tale of a desktop PC’s dead hard disk drive and how to replace one with a cheaper laptop hard drive
3. – OCZ SSD drive not recognised by BIOS & Windows 7/8.1/10 install