Note that Windows 7 and Windows 8.1 product keys have always been able to activate Windows 10, You must use the standard activation process and the version of Win7/8.1 must match the version of Win10. Use the product key for Win7 Home to activate Win10 Home edition and Win7 Pro to activate Win10 Pro.
A Successful Windows 10 to Windows 11 upgrade is free
The deadline to obtain Win10 free – the Home or Pro edition – was July 29, 2016.
Note that Microsoft’s support for Win10 ends on October 14th, 2025. Also note that Windows 11 is only available in 64-bit versions. As a result, it is not possible to upgrade a 32-bit version of Windows 10 to a 64-bit version of Windows 11.
A successful upgrade from Win10 to Win11 is free. Read the following article that goes into the conditions of being able to upgrade and othyer matters to do with Win11.
Digital entitlement to Windows 10
Fortunately, if you have a digital entitlement to Windows 10, the following page creates a Disc Image that can be used to install Win10 manually from a CD/DVD or USB flash drive without activation. Or you can use the product key from a retail purchase of Windows 7 or 8.1 to activate Windows 10. Remember that the versions of Windows must match. A product key for Winsows 7 Pro has to be used to activate Windows 10 Pro. You cannot use a Home Win7 or 8.1 key to activate a Pro installation of Windows 10 or a Pro Win7 or 8.1 key to activate a Home version of Windows 10.
Choose the Windows 10 option unless you want the KN or N versions.
Download Windows 10 Disc Image (ISO File) –
https://www.microsoft.com/en-gb/software-download/windows10ISO
Media feature pack for Windows 10 N and Windows 10 KN editions –
https://support.microsoft.com/en-us/kb/3010081
Installing Win10 free from within Win7/Win8.1 upgrades that version
Note well that if you install Win10 from within Win7/8.1, it upgrades that version. If you want to clean install it, use the install media to boot the system and choose the custom install option that comes up after you click on the Install button. That option allows you to choose to install it to an empty partition or drive.
Remember that to boot the system from a CD/DVD or USB flash drive requires the applicable device is set as the first boot device in the BIOS/UEFI BIOS.
Win10 free – Download and install Windows 10 and use it free of charge without activating
Most Windows users don’t know that Win10 can be downloaded from the links on Microsoft’s site, install it and use it free of charge without activating it. Apparently that state of affairs also applies to Windows 7 and 8.1.
Windows 10 installs with a 7 or 8 key, or even without a key. The only annoyance is a small watermark that reminds you to buy a license. A big change since Windows XP, which still requires reactivation if you change the computer’s motherboard.
It appears as if Microsoft does not make much money from selling Win10. Most people get it preinstalled on a new computer. For this reason, Microsoft prefers people using Win10 to Win7, which, like WinXP, is staying in use many years after new versions of Windows were released. Therefore, the company is not blocking the ways of using it for free.
Win10 free – Digital entitlement to Windows 10
The computers of users who upgraded to Windows 10 successfully from Win7/Win8.1, using the free offer that is no longer available, were given a “digital entitlement” to Windows 10 that exists for those computers even if they roll back to Win7/Win8.1.
Microsoft recognises the hardware setup on every computer that has Win10 installed on it that is activated in the same way as it recognises any other activated computer – by its unique hardware profile.
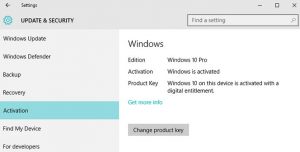
Every computer has a unique hardware profile. The image below shows the screen that is obtained by this click path: Start => Settings => Update and Security => Activation. It says: “Windows 10 on this device is activated with a digital entitlement.”

That digital entitlement remains eligible forever on any particular computer to which it has been granted. If Win10 is reinstalled from scratch, it will activate automatically without having to enter its Product Key.
Win10 free – Obtain the Windows 10 Product Key
When you have upgraded to Win10, you should obtain the Product Key just in case you need it to clean-install Win10. The Product Key is hidden, but there are tools that can reveal it, such as the Belarc Advisor from belarc.com under Free Download. The tool examines the system to create its report. When that is done, look under Software Licenses on the left side of the page it brings up. Make a note of the Win 10 Product Key and keep it somewhere safe.
Speccy from Piriform provides the Win10 product key plus plenty of system information faster. Install and run it. Speccy also provides system temperatures live, which is handy to identify overheating problems.
Note that if there is a major change of hardware that makes its hardware profile unrecognisable to Windows 10’s Product Activation, such as a change of motherboard, or Windows 10 is installed on a different computer, Microsoft will not activate it online.
Win10 free – Upgrade to Windows 10 to get your digital entitlement that remains valid if you roll back to Win7 or Win8.1
Therefore, if you want to upgrade to Windows 10 at any later date after the free option ends on July 29, 2016, all you had to do is upgrade to Win10 before that deadline and then either roll back to Win7/Win8.1, using the roll-back option that Win10 provides, or restore a system image of a fully updated Win7/Win8.1 created just before the upgrade to Win10 took place.
Rolling back the system from Win10 to Win7/Win8.1 is the easiest option but it might not restore everything that you had in Win7/Win8.1, but restoring a system image will, so it is the best method.
To roll back the system to its previous version of Windows, follow this click path in Win10: Start => Settings => Update and Security => Recovery. A “Go back to Windows 8.1” or “Go back to Windows 7” should appear under Recovery.
Note that the C:\Windows.old folder that Win10 creates holds the files that the roll-back option uses and if Win10 has been used for over a month, it deletes that folder, making it impossible to roll the system back to Win7/Win8.1.
When you choose a roll-back option, Win10 asks “Why are you going back,” and provides you with reason to choose from. It doesn’t matter which of them you select. The Other option is the most honest one in these circumstances.
You can also clean-install your previous version of Windows, which requires entering its Product Key, or restore a system image of it. I use the free version of Macrium Reflect to create system images in preference to Windows Backup and Restore, which, in my experience has failed to restore images. If you use the Windows tool, you must create a Repair Disc (only a system recovery USB flash drive in Win8.1) in order to be able to boot the system with it to restore a backup or system image.
Type repair disc in the Search box in Win7/Win8 to be provided with a link to a page that allows you to create one. You must also use Macrium Reflect to create a Rescue Disc that is used to boot the system to restore a system image. The option is called “Create Rescue Media” under its Other Tasks menu heading.
Note that to boot a Win7/Win8 with a disc or USB flash drive, the system’s BIOS/UEFI must have the CD/DVD or flash drive set as the first-boot device. Computers bought new with Windows 8.0/8.1 installed use a UEFI BIOS, which has a Secure Boot setting that prevents unknown devices – devices that Windows doesn’t recognise – from booting the system. If you can’t use a rescue disc or flash drive to boot a Windows 8.0/8.1 computer, disabling Secure Boot will probably fix the problem. Here is a video that shows how that is done.
How to Disable Secure Boot – Windows 8 –